![]()
High pressure pencil shooting, approx 450 Miles per Hour. There is no report.
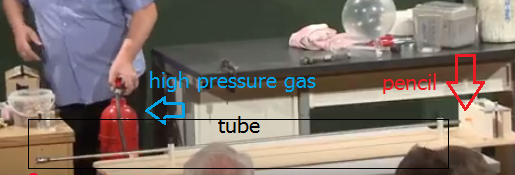
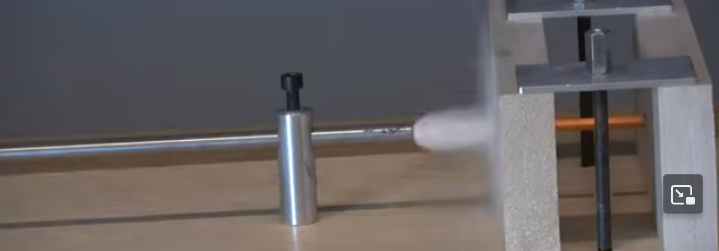
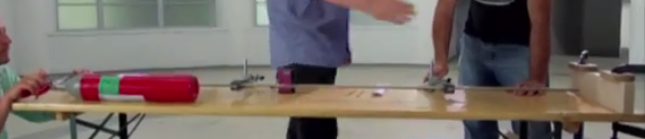
Maybe it is a crazy idea, you should blow some more gas into the barrel when the projectile leaves it. That could be a super silencer.
![]()
High pressure pencil shooting, approx 450 Miles per Hour. There is no report.
Maybe it is a crazy idea, you should blow some more gas into the barrel when the projectile leaves it. That could be a super silencer.
Thanks for pointing out the NYTimes article to me. I sometimes subscribe to it, since they have good coverage of things like the huge earthquake in Turkey, the Oct 7 raid in Israel, or even the fires in LA. The uber slanted POV on political articles turns me off, to say the least, though.
The article pointed out one tidbit that I guess was public but I that I missed: "The Secret Service’s acting director, Mr. Rowe, said during the August news conference that the existence of a second command center for the local officials “was unique, as I understand it.” "
This, plus the selection of one of the least qualified people (Myosoty Perez) as the Lead Agent and the least experienced counter sniper (John Marciniak) as the Team Leader, really reinforces my idea that this was a big setup.
Now that Republicans are in charge of everything, they can get to the bottom of who dictated that there would be two command centers, and decided that a fool would be the lead agent and (it would seem) a fool would be the counter sniper team leader.
As far as Crooks’ intelligence, 1530 on the SAT these days will get one in the 98th percentile, so he was mensa smart but not National Merit Finalist Smart. America First Legal Releases Academic Records of Thomas Crooks, Shooter in the First Assassination Attempt Against President Trump - America First Legal
And who dictated that Crooks behaved like a fool even though he had an IQ of over 130?
He used a rangefinder even though he didn’t need it and therefore behaved unnecessarily conspicuously.
He walked across a roof for 30 seconds in broad daylight and then lay down on a roof for 2 minutes, assuming that Trump would still be waiting for him on stage.
He used a drone at 4pm when all security was in place and in position. How can anyone be so stupid as to think this would go undetected under normal circumstances?
But wait, maybe everyone pretended to be a fool.
Then you would be the only fool. That can’t be the truth.
Translated with DeepL.com (free version)
But no cops did see that drone. How could that be?
That’s an interesting question, and I’m glad you raised it just now. I’m updating my analysis of Crooks’ travels in the Butler Farm Show area before he goes onto the AGR property, and I’m right at the time he flies his drone. I’ll address that in my analysis, so thanks.
My initial thoughts are the fact that the local LEOs are either at their assigned intersections waiting for the motorcade to come through, or at the Farm Show grounds, and the drone was most likely flown on the north side of AGR, approximately 200 yards from the Farm Show. We’ve debated where the drones exact location might have been, but we never considered what elevation he flew it at. It’s possible that many of the LEOs would not have had line of site to it.
Note: Pearson opened the intersections at 5:35 pm, after the motorcade passed through.
Caught this on the last page of that release:
“Think of it like a gym membership-- but for your future!”.
![]()
I’m going into “aspie” mode here before I put you on ignore for a couple of months again.
A lot of things don’t make a lot of sense. But you are skipping quite a few steps when you jump to the conclusion that I am a fool. Remember, the hypothesis that Trump set this all up (which is your view, last I saw) depends on Crooks going “all in” to the extent of sacrificing his life, the Secret Service going all in to the extent of trashing their reputation, and the head having to resign. The mainstream media is ignoring the scoop of the century for some reason, despite the fact that most of them hate Trump.
The Biden administration could easily have had Trump investigated for perpetuating this fraud, so they went “all in” in agreeing it was a real attempt.
I’ve taken up your hypothesis now that we know the railing shot came from behind the Hercules 2 team.
In answer to your question, an average velocity of about 1700 feet per second, with a muzzle velocity of about 1900 feet per second would give a snap bang time of about .220 seconds. It would be consistent with some larger rounds.
A note on my “fairly” simple techniques for making these images as faithful as possible to the highest resolution available.
If you have ideas on how to improve this or notes on what might be a problem with this, let me know.
You need to be watching a video in the same resolution it was videoed in. For Dayve Stewert, that’s 720 lines. For some other videos, it’s 1080 lines. You can have youtube show you the desired resolution by reducing your window so that the video will have the desired number of lines. This WILL take a little bit of fine tuning. See the starred * point below.
I’m using Irfanview these days, as it’s free, it seems to do what I need it to do, and yet is still pretty simple.
So, get to the desired frame in youtube with the “,” or “.” keys. Go to the desired frame, and hit the “Ctrl” and “Print Screen” keys at the same time to copy the screen to an internal clipboard.
Open irfanview, and select Edit/Paste. You should have the entire screen from the youtube tab in irfanview now. It will probably be scaled down.
Take your cursor and select the area you want to keep, then hit Edit/Crop Selection.
If you want to save from here without any further changes, select File/Save As, then select your preferred folder and file name. If you select JPG or GIF, there should also be a box of save options. The only one I cared about was the quality slider. You’ll want a high quality setting. I picked 95.
The smoothing process with JPEG is your enemy. We want to see what was in the video, with as much fidelity as possible. If you aren’t doing close-ups this isn’t so big a deal.
The way I’ve found to keep the extreme closeups in their original pixelated state is this: crop selection, zoom to 200%, 300% or 500%. Then do Edit/Show Paint Dialog. It’s most obvious when you zoom to 500% that showing the paint dialog lets you see the selection in it’s pixelated state, while viewing without it shows the selection with smoothing. We don’t want smoothing with these kind of closeups. We want to know exactly what the source shows and the exact level of detail, so we can guess what might have actually been there in real life.
If you have a small detail zoomed with the paint dialog on, you can hit CTRL+ print screen, then paste that right back in. It will look a little confusing, but just:
Keep in mind that even high quality JPG saves have lost information and smoothed lines. Don’t use that saved image again - start from scratch.
Here’s a sample output from Dayve Stewert’s video:
You can see the sky close to the tree branches looks lighter than it should. The roof panels also look too light just to the right of the shadows from the ribs. That’s a sign that “sharpening” has been used.
The dropbox videos are a lot easier. You can uncheck video/always fit window to get the video to show while neither being upscaled nor downscaled. Select the view/advanced control to be able to advance frame by frame.
Then perhaps I can find new ways… ![]()
unfortunatelly it can save only jpg format
(bmp would be better)
I have edited the reference line of uploaded picture
“![take snapshot|690x388]” to “![take snapshot|1920x1080]”.
oh, yesterday I saw 1440 resolution footages (and even higher 4k).
It seems not necessary. The right resolution will be shown after posted.
I found a better way to run youtube in exactly the resolution that it’s streaming at. Right click on the video, then select “Stats for nerds”.
It will show you the optimal resolution, and the resolution you are using. If you have a high enough resolution monitor, you can decrease the width of your browser so that you are viewing at exactly the same resolution it’s streaming at.
Very Good work.
its necessary to build on other people’s work (efforts).
My stand (from beginning is “crooks” was a sheep dipped patsy. He drew attention to himself. I say “crooks” because I doubt that was his name.
The real assassin, by the grace of God missed. (first shot is critical).
Not convinced that man on roof was “crooks”.
Assuming that dead man on roof was “crooks”.
Would the anomalies you found in the police car audio, if intentionally created, be suitable to cover up the sonic boom of bullets fired from the rear two-story building over Thomas Crooks?
Have you already analyzed the version of BWC2-122110 (Det. Collins trying to climb onto the roof)? Originally the sound only started after the shots at 18:12:08. In the new version, the sound can already be heard during the shots, but it sounds very muffled.

Was the soundtrack of the police car simply copied in here?
The video was published on the youtube channel Butler Eagle.
yes
and speeded up occaisonally
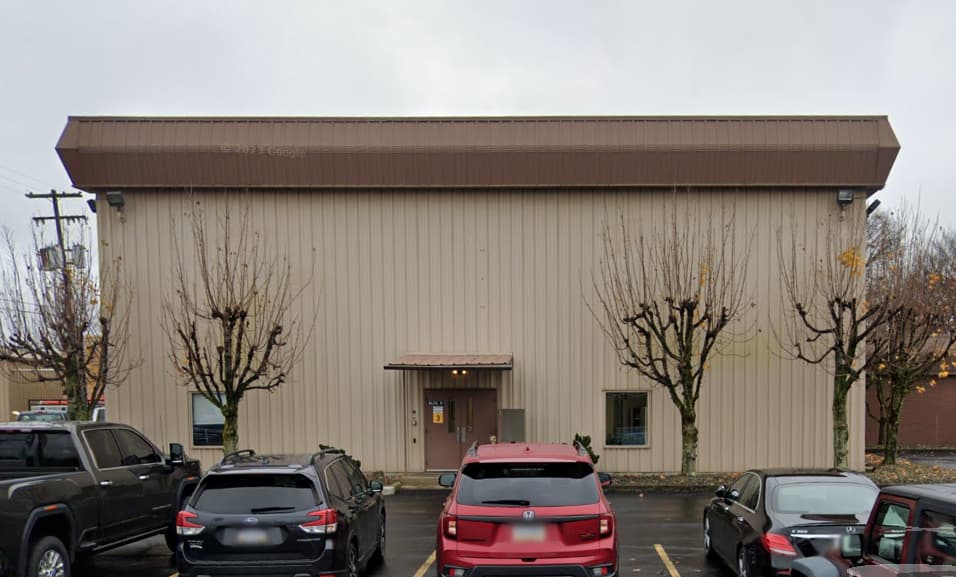
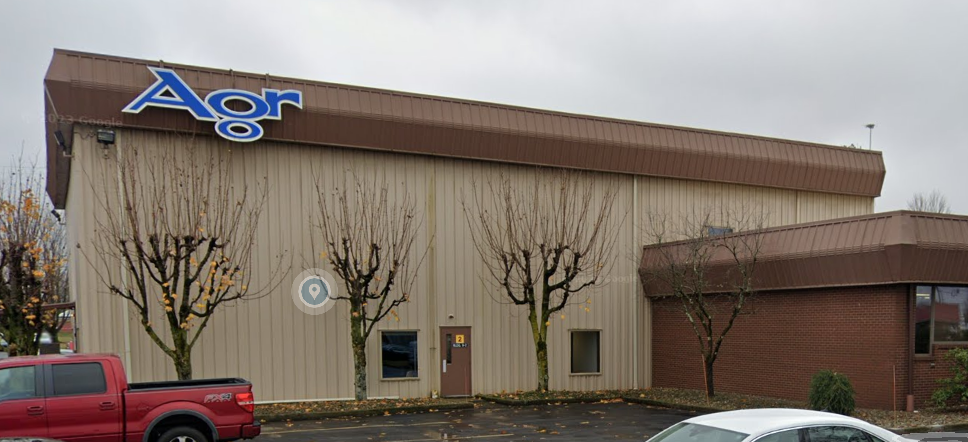
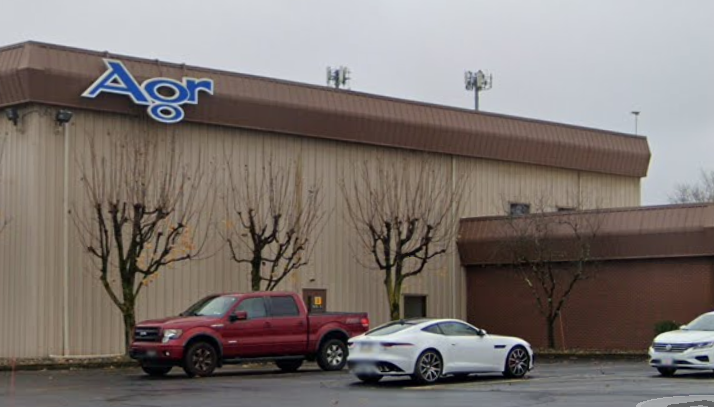
What do you think the interior of AGR 9 looks like?
What normally happens inside?
It has surprisingly few windows, only four on the ground floor and only two on the first floor.
That’s very unusual, isn’t it?
Do you think the first floor could have several rooms?
Maybe a high industrial hall, not unusual. There might be cranes for production.
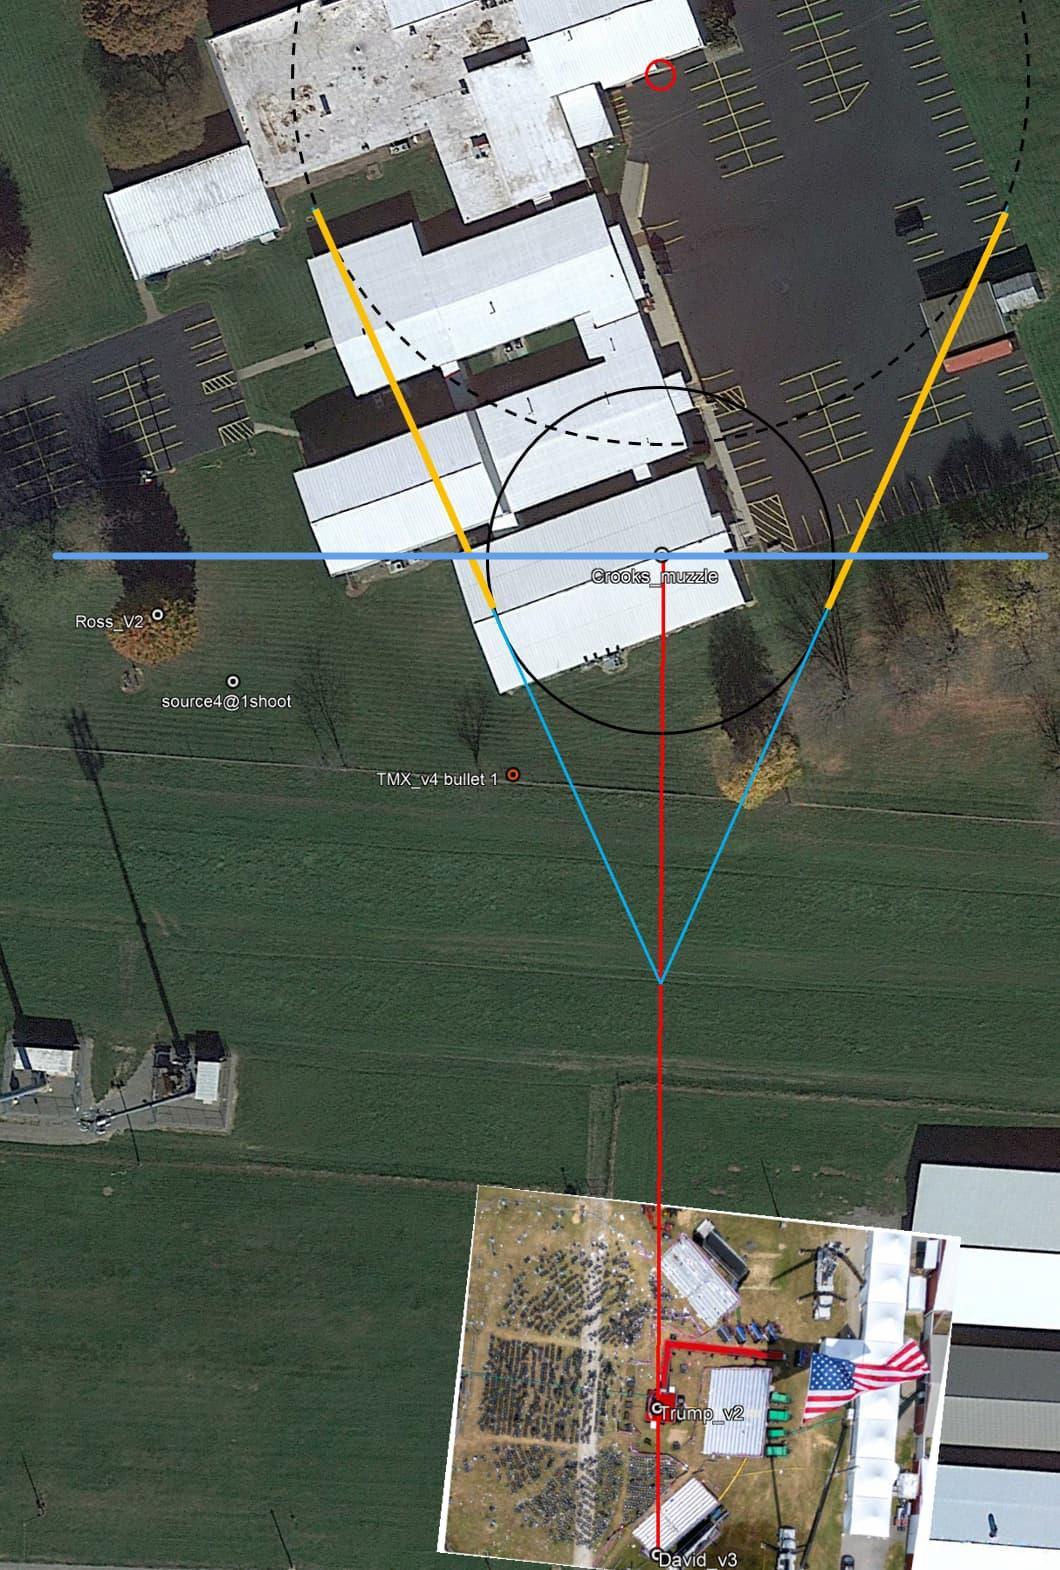
Why doesn’t the blue mach cone in your image start at the height of Crooks?
Greg Nichols did not indicate any sonic booms for the Dayve Stewert, Ross/TMZ, and TMX videos in one of his videos. He did it here for TMX and Dayve Stewert.
Snick-boom differences for shots 1-8.pdf (215.5 KB)
In my opinion, the sonic boom and report overlap at their locations.
Can you rule out the possibility that the sonic boom from the bullet that may have been fired from the rear two-story building and the muzzle blast from Crooks’ rifle overlap in the Ross/TMZ video?
Translated with DeepL.com (free version)
Are you sure that no sonic boom can be heard on the recording by Ross/TMZ/Source 3?
@vt1 posted two images. In the first one, the sonic boom appears to reach Source 3.
In the second image, it becomes clear that the difference between the sonic boom and the report could or should be very small.
Could it be that you couldn’t clearly recognize the sonic boom because of this very short distance?
Could it be that in the blue-framed area of the following image, the muzzle blast or the bang caused by the ignition. reaches the microphone from source 3 before the sonic boom?
@kincses-zsolt What do you think?
Could you ask the AI? So far, I only have access to free, low-performance AI and haven’t received a clear answer.
Does the sonic boom reach the area framed in blue?
Greg Nichols:
“This data set has demonstrated to me that any sound recorder within 50 yard of the path of a bullet will record the bullet sonic crack and that crack will arrive a significant amount of time before the muzzle report fron the rifle does.”

Mike Bell has made a similar claim. According to him, the sonic boom did not reach the TMX recording device because it was too far away from the bullet’s trajectory.
Mike Bell claimed this in one of his videos:
“The sonic boom picked up only if you’re very close to the bullet.”

Can the sonic boom really only be heard from a short distance away from the bullet’s trajectory, or did both fail to recognize the sonic boom because the difference between it and the report on these recordings was so small?
If the latter is the case, it could be very difficult, if not impossible, to clearly identify the sonic boom on the Ross/TMZ/Source3 recording, because the distance between the sonic boom and the report should be the shortest on all recordings.