Starting seeds indoors is an excellent way to get a jump start on the gardening season so you can save money on the various foods you plant. Starting seedlings is a highly rewarding and enjoyable endeavor. We have been using the following growing system for many years now, and year after year it continuously produces reliable and excellent results. The components for this system are readily available at most hardware stores and can be sized to your specific needs and growing space.
The three main considerations when starting seeds indoors are:
- Maintaining moisture levels
Maintaining the proper moisture level during germination is essential in producing high germination rates and getting healthy plant starts. Daily watering and/or the use of domed containers may be necessary to keep soil and seeds moist. Keep in mind that over-watering can be just as detrimental to your new seedlings as letting your soil dry out. Molds and fungus can begin to grow if soil is kept too moist.
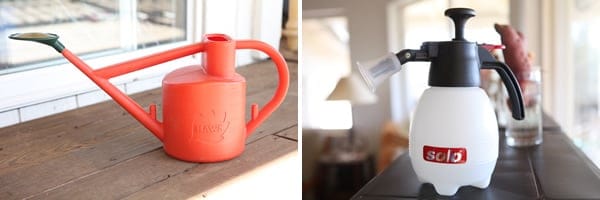
We use two types of watering cans to make sure we get even and thorough watering for all the seedling plants. Our preferred watering can is a 6L Haws Watering Can. The Haws watering can has a perfectly balanced handle and spout, and the upward facing watering rose gives a fine, gentle rain that is ideal for newly planted seeds. We use the Haws watering can outside, and thus have to move our flats out to our deck to water them. We also use a pump mist sprayer (ours is one made by Solo, which we highly recommend). The pump mist sprayer works great for those times that we just need to add a little bit of moisture to the seed flats.
Haws 6-Liter Plastic Outdoor Watering Can Solo 418 1-Liter One-Hand Pressure Sprayer
- Establishing proper germination temperature
Creating an environment with the proper temperature for high germination rates usually requires an external heat source. We prefer to use seedling heat mats. We have found that the use of heat mats makes it very easy to keep the soil in the 70-80 degrees F range, which greatly reduces germination time, thereby reducing the time spent maintaining other components of our system.
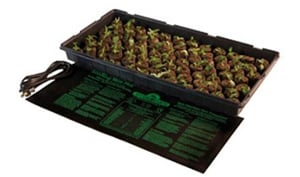 We use the Hydrofarm Seedling Heat Mat that measures 9 inches x 19.5 inches and will fit under standard plastic nursery trays, Jiffy 72-seed plug trays, and our custom made seedling cedar boxes. We also selected our shelving option based on the size of the trays we use and the size of the lighting fixtures for the overhead lights. The seed heat mats are an investment upfront (+/-$22 - $25 as of the writing of this article), but we have had ours for well over 10 years and have yet to have one fail or need replacing. When we consider how much money we have saved by starting our own seeds vs. buying them ready to plant, the investment has paid for itself many times over.
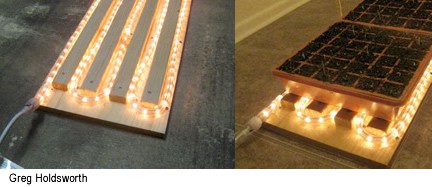
We have plans to build a custom sized heat mat using a retired set of indoor/outdoor rope lighting that we have stored in our garage. It was mentioned in the indoor seed growing discussion and a great tutorial can be found here.
- Adequate light
Providing enough light during the still dark days of winter for early seeds starts can be tricky without the use of supplemental light sources. If your newly developing plants don't get enough light every day, they will become leggy and weak from stretching for light. The system below will highlight our method of providing 14-16 hours of "daylight" in a cost-effective way to produce hardy and healthy plants.
Indoor Seed Starting System
Keeping in mind the three components of successful seed starting, below is our customized indoor seed starting station. Its main purpose is to establish seedlings in a compact and controlled environment to later be transplanted out into large 4" pots and then stored in our greenhouse until they are ready to go into the ground or we are ready to plant them (having prepped their new beds).
We chose inexpensive shelving ($15 each) that would accommodate our shop lights, the heat mats, and our growing flats. The shelves are put right next to each other, allowing for the grow lights to span across the length of the two shelves.
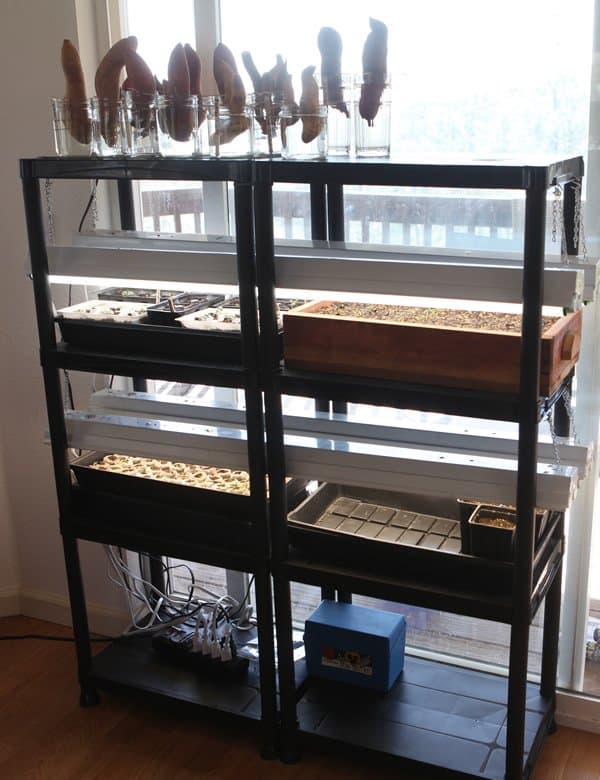
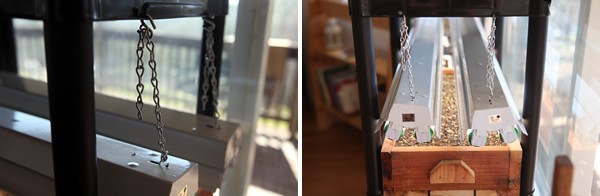
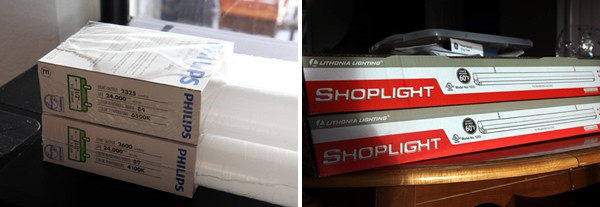
Our light fixtures are the most inexpensive shop lights that Home Depot offers. Two lights on each shelf provide enough light for every plant growing on those shelves. We use alternating cool and warm T12 bulbs in each light fixture. They provide a wide spectrum of light and cost about 1/4 of what the "grow bulb" systems are offered at. After drilling two small holes in each side of the plastic shelf, we fastened S-hooks and used the provided chain to hang the shop lights above the plants. The chain and S-hook setup allows for us to easily adjust the height of the lights as the plants grow. We strive to keep the lights always 1 or 2 inches above the growing plants.
Plants growing indoors need to have at least 12 hours of artificial light, and more is even better. We keep ours on a timer that turns the lights on for 14-16 hours, then off for 8-10 hours. We use a power strip with a built in timer that is just perfect for our setup. It has 4 outlets for continuous usage (which we use for the heat mats), and 4 that can be turned on, off, or via a cycle run through the built-in timer. Here you can see ours plugged into our Kill-A-Watt to get a good idea of the power being used and what our estimated costs will be. So far, with all components running, the system uses 271 watts.

By using a combination of our seed flats and this indoor growing space, we can grow a lot of plants in a very small and efficient space, during a time of year when the days are still short and our unheated greenhouse is still a little too chilly. The plants will spend their first couple of weeks in this space, after which time they will be transplanted into larger 3 or 4" pots. At this time we go from having 4 - 6 flats to 15 - 20 flats. Usually by this time, the greenhouse is warm enough, and the days are long enough that we can move the flats outside.
Since the plants have been started indoors, they will need to gradually become accustomed to the outdoor and greenhouse environment. This gradual process is called "hardening off." We harden off our plants at two separate stages -- first when they are moved from our indoor growing environment to the greenhouse, and then again just before being transplanted to the ground, when they are moved out of the greenhouse. Hardening off is simply the process of acclimating the plants by moving them to their new environment for increasingly longer periods each day. It may sound like a lot of work, but the rewards of having hundreds of plants to put in the ground are worth it.
The system is a great little weekend project to set up (should only take two hours to get everything in place) and gives the capability to grow lots of new varieties of plants and with better results in the long run. We encourage you to give indoor growing and seed starting a try and hope to hear feedback and ways to improve things from your own experiences.
~ Three Meals Farm
This is a companion discussion topic for the original entry at https://peakprosperity.com/diy-indoor-seed-starting-station/
