I
I purchased two and a half contiguous lots in the middle of Philadelphia a few years ago. The lots were paved with old broken concrete. The 1/2 lot was an adjacent 40' by 20' set of garages that was on the city's demo list since it was in fact falling apart. The whole property was bound by brick walls, except for the front.
I scavenged 100 feet of 12' tall industrial grade cyclone (chain link) fence, and using a small bolt cutter to reduce it to 10' used it to fence in the front and secure that area. (I only needed 40' of this) I also scavenged a 9' double gate and installed it as well. Old East coast cities are nice in that you can find many materials on Craigslist or other ways cheaply. I did end up buying most of the vertical poles for the fence, however.
I rebuilt the dilapidated garage and converted it into a workshop. I designed and installed a water catchment system using the water from this roof. The new roof surface was "torch down rubber." Before I coated this with aluminum impregnated asphalt paint ("silver coat") the water (regardless of how much water I diverted at the beginning of each downpour) would have roof impurities in it. Once it was coated, the water was much cleaner (I had it tested - no problems).
The system works as follows. There is a "y" directly below the roofdrain. The vertical component of the y leads to a shutoff valve and then a simple filter made of 4 inch pvc, rubber boots (for access) and stainless steel mesh. Following the filter the line (2 inch pvc) runs into a 55 gallon drum through the bung hole. I forget whether it was the coarse bung hole or the NPC threaded one. I used alcohol solvent based gasket cement on the connections. It is blue and works well. In operation the first 55 gallons of rain runs past the y through the strainer and fills the drum. By the time it is filled the roof is washed and the water backs up or rises in the pipe. Once it reaches the height of the y the remaining rain passes through the arm of the y and to another shutoff valve (also normally open). From there is passes through another strainer and then into and past 2 55 gallon drums plumber together and on their sides ABOVE (on a support structure) the gravity fed bathroom in this shop. So, these fill first. I won't go into how I did this other than to say regular pvc cement and more gasket sealant at the bungs. Each drum has 2 bungs, so you run the water into them (using a T so they both fill in parallel) and another T and adaptors from 2 inch to 3/4 pvc and then UP, acting as an air release vent. The drums are, as I said, on their sides, adjacent one another with the bungs oriented vertically. The lower bungs are for the water feed; the upper ones are the air vent (so it can fill).
Once these are filled up, the water continues on to the outside of the building. I planned this as I rebuillt the shop, so I encapsulated a 2" pvc pipe through the brick front when I rebuilt it. At this point the water line is about 9' or so above grade. From here it runs into a 1000 liter IBC (intermediate bulk container) (please look this up if unfamiliar). This one originally had olive oil in it. I paid $50 for it.
Important: Cheaper IBCs are not provided with bottom valves of high enough quality to be used regularly. They will eventually break or the plastic leading to them will if you plumb the system relying on these valves for daily use. Leave the valve but plumb in a regular use valve after it. You will need to support this valve and any lines or spigots. I used wire.
So, at this point you have 1000 liters of rwater in storage. I installed it on top of about a 5' tall mortared cinderblock platform for storage beneath and some assk gravity water pressure. Head builds at about .5 psi per foot of tank height. So at worst I get about 2.5 psi and when full about 5 or 6. This is plenty for a vigorous flow through a 3/4" sillcock. This is insufficient for running through a regular water hose to the garden (remember the rest of the lot?).
[Before going on I need to explain how I drain that first drum under the "y." Recall that there are 2 bung holes in the plastic drum (use plastic, not metal drums - should have mentioned that earlier). The unused one is your drain line. You need to thread a half inch male pvc adaptor through the bung plug (they have a cylindrical threaded depression in them for this purpose) and seal that. (You need to drill it out first.) Then you cut the proper length (about 33 inches) 1/2 inch pvc pipe and attach it to the end of the male adaptor protruding through the bottom of the bung plug. Make sure this is sealed well. Now, thread in the bung - again, use gasket cement. What you now have is a half inch tube running to the bottom of the barrel and sealed in. You add a couple of elbows and run it back down the side of the drum and from there to a valve and drain. When the rain stops, you open the valve and the drum drains through vigorous siphoning action. Recall that the water is backed up all the way to the top of the "y." So there's plenty of pressure to expel this sacrificial water. It takes about half an hour to empty. Just remember to close it again for the next storm. Why did I go this route rather than a spigot at the bottom of the barrel? Two reasons: 1. It's a pain to install a spigot in a barrel that is closed… All the methods I could envision had in my opinion a high likelihood of failure eventually… 2. This method is cheap and foolproof…]
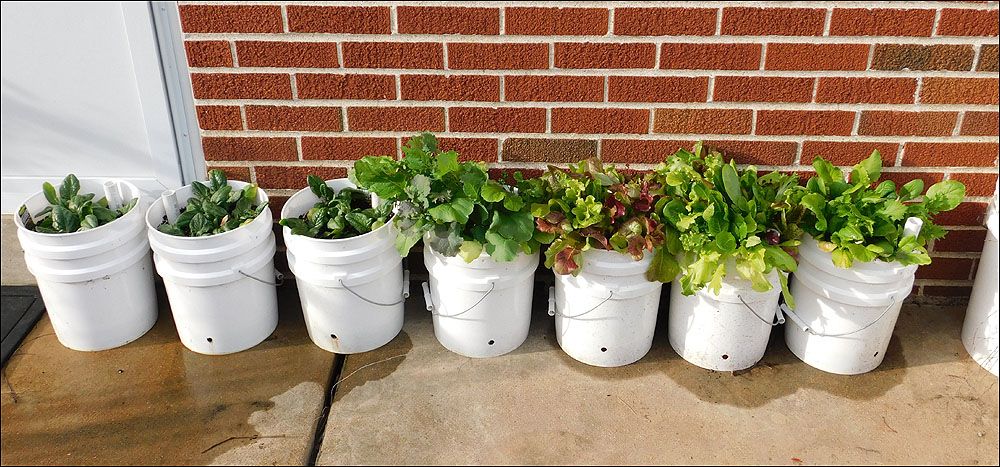
Anyway, the first year I just dealt with the slow flow. The second, I designed and installed pvc drip irrigation for each bed with 5 gallon buckets at the head of each bed connected to 3 or 4 half inch pvc lines. All was dry fitted. The beds were 25' by 4.5' - 5'. I drilled 1/16" holes every 8 inches or so in the lines and capped the ends. It worked fine but you needed to fill the buckets 2 or 3 times to get adequate irrigation. Also, you need to support the buckets about 1' or more above the lines for enough head pressure.
This was acceptable but still slow.
The 4th year I expanded the garden and went ahead and bought a 1" clear water pump. You could use a shallow well pump or a pressure booster pump. The price is anywhere from $40 to $150 if you are willing to go with Harbor Freight (boo, hiss…). Northern is another supplier… Anyway this meant that with the flick of a switch I had pressurized water. This allowed regular water hoses and watering techniques. I kept the bathroom on gravity feed of course.
I could have stayed with a gravity flow system by hard plumbing 1 or 1.25 inch lines to the beds and put in valves and such, but pressurized water does have advantages. If off the grid, I'd still opt for solar or even a generator to be able to run a pump. It's just a lot easier to get good results this way.
So… Amanda, if I were you, I'd just buy a pump. You can even get decent pressure with a cheap sump pump.
Ok, now to the beds…
I was on cracked concrete. I removed some of it but decided it made more sense just to leave it and build on top of it. This meant I didn't have to worry about what might have been in the soil under the concrete… Also, I would have had multiple yards of concrete rubble to dispose of… Yes, I could have used it for the bed walls…
I used cast off wide dimension lumber for the bed sides. Went up about 2.5 feet. The lumber was rough hewn 8" by 10" 6' long lengths from dismantled "crane pads." The city had recently rebuilt the elevated transit line, and there were hundreds of these lying around in the work areas. I located the supervisor and he gave me the ok to take them (saved him some hassle). They looked great though I had to drill holes through them and pound rebar through them to stack them securely. Large interesting wood beetles and grubs appeared the next year and they began to degrade. The grubs added dung to the soil though and there were very interesting mushrooms on bed exterior sides.
It took 4 years or so, but I had to replace all of these walls. The beetle population went through a classic Malthusian population bloom/die off sequence. I opted for 8 and 10 inch cinder block dry stacked 3 high. Works great and affordable but a little less attractive. I would not use wood again.
An advantage to dry stacked cinder block in the city is that on an asphalt or concrete lot (or even an impacted dirt surface) you could easily reconfigure your beds if you wanted. I could even envision running a small CSA on a larger lot, and with a front end loader one could move soil around and add amendments easily, since the blocks are readily moveable. Go at least 2 high. 3 is better and acceptably stable.
This method also allows for easy addition of modular polycarbonate or glass covers for cold or hot frames and season extension. Last year I had greens all winter by isolating a 12 by 6 section and looping a roof de-icing cable through 6 inches of soil and then placing the greens in 5 gallon buckets above this soil, with more soil (compost) just tossed in between. I put glass frames (salveged from a defunct easter lilly grower who used them for hot frames) on top, and used a photo eye to control the activation. I had greens galore all winter. The electricity cost was about $1 a day if that… Well worth it for what I got out of it, foodwise.
My soil came from the city's Fairmount Park Recycling center. A few years ago they got serious about their composting operation and bought the necessary equipment for a row composting operation. I forget what they charge per ton (don't buy it after a rain), but it works out to about $60 per truck load, maxing out a 3/4 ton truck… I use this compost direct. It has no clay in it, so the only problem is that the beds drain and dry out more quickly than they would otherwise. I go through 100 gallons of water a day in August (without rain) , with 5 beds and assorted container vegetables. I forgot to mention that I added more rainwater catchment storage - 1000 gallons total or so, not counting the bathroom.)
One other thing. These beds are ridiculously productive so I plant closer than usual. I don't get the circulation problems one might expect from this - even with tomatoes (don't allow any tobacco smokers near them, by the way (tobacoo mosaic virus)). I think it's a matter of healthier plants (no chlorine in the water, for example) and the top layer of the beds drying relatively quickly. The close spacing also reduces weeds. You want to keep some weeds around though… I have noticed that aphids prefer certain things so I tolerate a small amount as trap plants…
Bottom line: consider cinder blocks but make sure they don't have any contamination in them; compost works great as soil; re rainwater catchment, do some research on the web - there are plenty of fine videos on them, but don't waste your time or money on the 55 gallon drum kits they sell at places like Whole Foods unless you're gardening in a very small space… Go bigger and do it right. And don't be afraid of a little tech when appropriate or justified by cost benefit analysis. My avoided water bill more than jsutifies or absolves me for the use of the pump. Also, get a cat… It took the squirrels a little while to realize mine was serious about eating them…
Hope this is helpful - sorry about the length.
-Dave
My wife and I just returned from 15 minutes in our backyard "farm". Here's what we returned with:

- Gravenstein apples
- eggs
- chard
- kale (Russian)
- cucumber
- carrots (Atomic Red & Jaune Obtuse du Doubs)
- heirloom tomatoes (Morado)
- green beans (Kentucky Wonder Pole)
- red pepper
- butternut squash (Waltham)
- potatoes (German Butterball & French fingerlings)
At this point, I'm happily declaring the first year of this new garden a full success.
Congrats on the bounty! Right now, I have tomatoes coming out of my ears! On my 5th batch of Bloody Mary Mix!
Brussel Sprouts are a bust for the 2nd year in a row
Garlic did ok, considering the amount of contruction equipment that ran over the garlic bed.
Carrots got into the separate raised garden bed and made short work of lunch.
Onion, wow, do we have a lot of onions!
Beans, we didn't even pick anymore at the end, it was bumper crop.
Miscellaneous other stuff, all grew well.
I built my beds late last fall. I got locust from a nearby mill. It lasts decades rather than years. I got 1"x8" boards, figuring a full 1" thick rough cut locust is at least as strong as 2" milled pine board (1.5" after milling). My beds are currently single height. I built the beds 4' wide in a big "C" 32' long x 11.75' wide w/ a 7' opening on the side facing the gate and 3.5' paths. This "all one bed" approach greatly cuts down the ratio of lumber used / square feet of bed, reducing cost. The most difficult part of working with locust was it's hardness - lots of very hot drill bits and probably about a 20-30% breakage rate for screws.
I used this hose to get water to my simple irragtion system. It uses drip irrigation tubing and mini sprayers to minimize cost and get rid of all of those skinny little drip lines at ground level. I will install it as soon as our crazy late northeast winter ends. I figure the timer will irrigate every day or two before sunrise when dew is present anyway and the wind is light, so there will be minimal wasted water and little additional wetting time for the leaves.
Also for this spring, get soil (my own compost composted horse manure, plus a prepared garden mix), build the fence (8' unpeeled locust posts - not perfectly straight, but slow rotting and only $3 each). I've also purchaced these pots to put next to the beds on the asphalt driveway (the 15 gallon size). These plus some plastic recycling bins will be for growing strawberries. I'll have traditional drip emitters in these pots.
Rob,
We struggle with poor quality garden hose all the time. Lots of hose end replacements and kinks and always issues. Saw your link to the 1" Flexogen hose http://www.amazon.com/Gilmour-Series-Diameter-Flexogen-10-10100/dp/B000X… and wonder if you have tried all rubber hoses. I bought one at Home Depot just cause I was fed up and paid a lot, but really like it. Have found a link to a 1" all rubber hose. http://www.factorydirecthose.com/product/300EN-STC10-S12-BCP6-100 It costs 40% more, but weighs 52# instead of 42# on the flexogen. I can't imagine the rubber one is worse for the environment. What do you think?
Olive oil guy,You might want to check out the hose I linked to 2 comments up. It's only 3/4", so it might not flow as well when gravity fed. I haven't used it yet, but have it in my possession and it seems to be super sturdy with heavy duty fittings and very low chance of kinking. Plus it's lead free and drinking water safe, something I insist on for a vegetable garden hose. I'm using a 75' and a 50' (total 125 feet of run) for overhead mini sprayers on drip tubing. The cost is $50 for a 75 ft hose or $40 for a 50 ft one. The outdoor faucet flows at about 6 GPM at the faucet (40-60 PSI household system, but lots of 1/2" copper and a water softener before before it gets to the faucet). My calculations tell me I'll get about 5.5 GPM at the hose end.
You can use this online calculator to see how much flow you'll get with different hose lengths and diameters. A gravity fed system gets about 1 PSI for every 2.25 feet of elevation drop (waterline in tank to hose outlet).
Found this review and trial of hoses. Looks like Sears all rubber 50' is top ranked here. http://thesweethome.com/reviews/the-best-garden-hose/ Cheaper from Sears than from Amazon.
Thanks for this great detailed post on raised beds. I've been referring to it all spring as I build mine. In my part of the northeast U.S., folks out in the country cut locust, a very hard and rot resistant wood. Some folks mill it into rough lumber. I used 1"x8" locust boards for my beds. Others cut it for firewood. They split the straighter pieces into chunky 4" fence posts (like a long piece of split firewood), because they can sell those for more money. Good locust posts are mostly heartwood (the most rot resistant part) with only a thin layer of bark and sapwood. They are quite handsome if you like the rustic look. I found some excellent 8' locust posts on Craigs list for $5.50 each, about the same price for the light-weight t-posts, but the locust will easily last 30 years, while the T posts might last 10-15 at the most (perhaps a bit longer for the heavier grade). I paid $20 delivery for 17 posts to save myself the 25 mile round trip plus possible damage to my car from those heavy posts in the passenger area.
Quercus -Glad to hear this primer is providing helpful guidance as you build your own raised beds.
Locus wood posts sound like a great replacement for T-posts. When you have a moment, would you mind posting some pictures of your garden fencing?
I just had 6 yards of wood chips delivered from the town highway department - for free! They're going to go on the paths on top of the cardboard and old plywood (salvaged from a tree fort in the woods that I renovated with the kids). Pics of posts and chips and paths and beds, etc. will come as soon as I figure out how to upload images (or someone tells me).
It is a bit of a workout to upload pictures for your posts. But here is a description:
-
On your computer, make sure the picture is not too big. 150K is the maximum size. There is also a limit on the number of pixels. I use a Mac and in the Preview program is a Tool called Resize. Shrink the picture and save the smaller one on the desk top.
-
At the pp website, open a "Post New Comment" box and put the cursor where you want the picture to go. Click the rectangular "picture icon" in the icon row across the top of your comment box. This opens a dialog box titled "Image properties." Click the "Browse Server" button.
-
This opens a window "File Browser". In the upper row at the left choose "Upload."
-
A small sub window opens in the upper left of "File Browser" window. Click "Choose File".
-
Now you see the items on your computers desktop. (This is why it was handy to have the picture on you desktop before starting this process.)
-
Click on the picture name and "OK" or "Choose."
-
This brings you back to the sub window in the "File Browser" where your picture name is now selected. Click the check box "Small" and then "Upload." If the picture was too big, you'll get an error box that said "Upload Failed" which will disappear before you have a chance to read the reason why.
-
This brings you back to "File Browser" which now contains your picture, and sometimes, a smaller version of your picture.
-
Select the name of your picture in the list on the right side of the File Browser window, then, "Upload" button at the top of the window.
-
If the picture won't upload it is because either 1. it was too big, or 2. your flush on the pp server is full.
Thanks, sand_puppy.Here's a video tutorial of the same process:
https://peakprosperity.com/tutorial-adding-images-within-post-or-comment
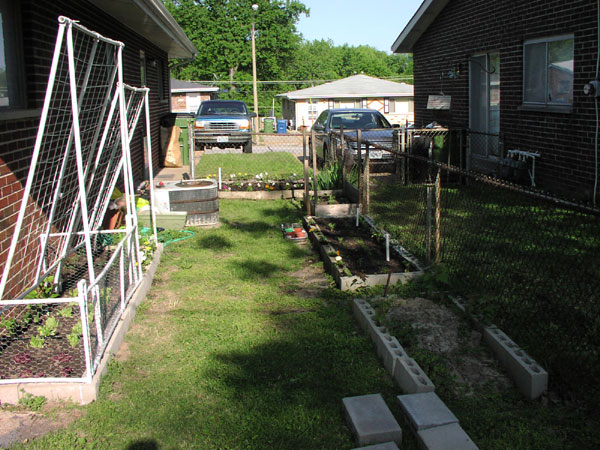
After dealing with weed problems, rocky soil and other issues in my garden for a number of years, and inspired by Adam's posts last summer, I decided to install raised beds. Another incentive was that I had planted apple trees a few years ago, siting them carefully in about the only good spot. Within a few years, they would interfere with the vegetables. I shifted the garden about 30' to the north. I had to remove a bed with a few shrubs and lots of flowers and herbs. I moved the herbs to near the young apples. One plus was that the new site was closer to the house and a bit sunnier than the original location.
I constructed the beds from 1"x8" locust boards available from a small nearby sawmill that specializes in locust. At $3 per board foot, the price was $16 per 8' board, about 60% higher than 2" (really 1.5") thick pine,and probably stronger than the pine. I designed my 4' wide beds beds in a big "C" shape 32' long and just under 12' wide with a 3.5' central path and a 7' entrance to the central path. This minimized the amount of lumber per sq. foot of bed space. The boards turned out to be 8.5-9 feet long, which made a big difference in how many fit in my car, so I had to make 2 trips - always ask! Note the 6' stake in the center. This will hold irrigation tubing and a micro sprinkler.

Here are some details on the construction:
Corner's reinforced with 2x2 locust and joined w/deck screws.

Boards joined on long runs with 2 short sections of 1x8: (Bonus to whomever can identify that little weed seedling).

2' lengths of rebar pounded in every 4' to prevent beds from bowing out (a possible alternative might be to use 1.25"x8" locust):

You can see I used cardboard and old plywood to kill the vegetation below. I avoided landscape cloth because I don't want tiny bits of plastic all through my soil in 20-30 years. I made the mistake of putting the cardboard down after building the beds. Next time, I would put in over the entire garden footprint, paths and beds to avoid the gaps at the bed edges and save time.
The free chips from the town to put over the cardboard in the paths (note the 15 gallon root pouches in the background available from Gardener's Edge.) Both degradable and nondegradable version are available. They are placed where the fenced area extends over the asphalt driveway.

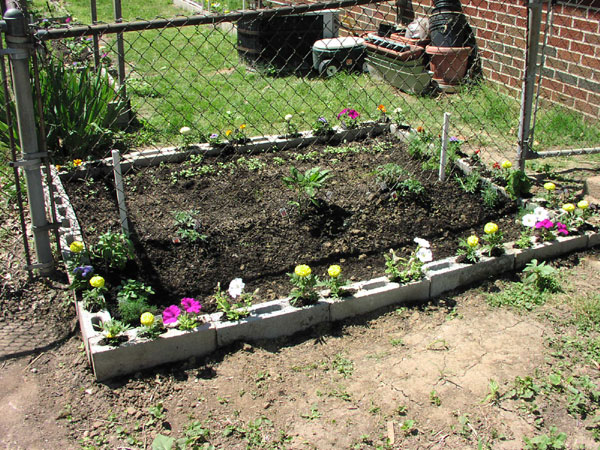
A spring afte-thought: a few extra beds for asparagus and sprawling veggies like squash in the part of the old garden farthest from the apple trees. Used old bricks and paving blocks to build the beds:

And finally the locust posts - found on Craig's list. $113 for seventeen 8 foot posts including delivery. They'll last 30 years. The posts will hold a 6' high 4"x2" mesh wire fence that will double as a trellis:

The posts as delivered:

Thanks Sand Puppy and Adam!
Beautiful job, QB - absolutely beautiful job.We especially like the "C"-shaped garden. Its seems a very efficient shape to work on and to sprinkler/water. Also, kudos for moving things like the herb garden when you realized there was a better configuration.
Glad to see Chris and Adam have resurrected this informative post in the Covid19 health crisis.
The garden they set up can be too much for smaller gardens in an urban or suburban environment, especially if you rent or have limited sun. I set up a smaller garden using not wood beds but concrete partitioning blocks along the South side of the duplex I rent.
Landlords will often let you garden BUT they want to know it doesn’t present a ratty and cluttered appearance. These blocks allow the lawn care people to just go along the side with their weed eater. They are cheap and easily taken up when you move.
Here is a tutorial I wrote on my current garden.
I thought I’d share pictures of this year’s garden with the forum. This is the second year I’ve been doing a garden at this location.
I know many here are like me, stuck in a suburban area with not alot of space for a garden. I also rent, which makes it a bit more difficult. Originally I was in the north side of a two apartment duplex, but when the south side opened up two years ago, I got the landlord to let me move to that one.
Just my opinion but if you have to rent, find a duplex. They are usually comparable in rent to a two bedroom apartment (mine’s just $525) but you have some yard space to call your own. Mine also has a full basement which gives me loads of space for storage, or perhaps learning to brew beer or grow mushrooms (both on my list.) Find a landlord that is ok with you doing a garden and you’ll be a long way down the green wizard path in no time.
Here’s a picture of the space I have and the garden so far.

The workable space which is from the fence to the end of the apartment is about 40 feet by 10. I can perhaps go back on the side of the fence another 20 feet but there’s a walnut tree in the backyard which makes it hard to grow anything under it.
When I first approached the landlord about putting in a garden, what I found was he didn’t mind me doing it, but he didn’t want it to look bad. He was concerned about the neighbors complaining, the lawn care people having trouble with the weeds or tall grass, anything that might make his life more difficult.
So raised beds were a must.
I looked at the various materials and ended up going with concrete blocks. These are called “partition blocks” and I got them from the big box hardware store for about a dollar a piece. They are as big as the normal concrete building block but half as wide (16"x8"x4").
Due to their weight, I didn’t have to stake them into the ground, just bury them a few inches into the soil. A plus is they allow a wide range of layouts and if I have to move, can be picked up and taken with me.
A nice thing is they have holes in their centers, which provide me with a handy area to add flowers to attract bees, as well as herbs and companion plants to ward off pests.
Here’s a close up of one bed.

It is made up of 18 blocks ($18) giving me an area roughly 9 foot by 2 1/2 foot, or about 22 square feet of space. I added about 10 sqft of compost this year ($8), and a similar amount the first year (bought from the nursery, don’t think the landlord is ready for a compost bin yet). Plants ran about $35 (half that for the flowers), for a total of roughly $70.
(Yes that’s a rubber snake. It’s supposed to scare the squirrels…lol.)
This bed has a row of potatoes in the front, carrots in the middle and beans and okra on the fence.
I did use seeds last year but because of a variety of factors ended up buying plants from the local nursery this year. I’d like to eventually grow my own seeds but that’s in the future plans.
Note the two white pvc pipes sticking up out of the bed. Missouri has a high clay percentage in their soil, so I dug up the bed to about 24 inches deep and mixed in alot of compost, peat moss and some vermiculite to loosen the soil. Last year during the Summer months I had a problem getting the water to soak in well without sitting on the surface, the clay tended to form a crust when wet then baked by the sun so this year I decided to install an underground watering system to get the water down to the roots.

I chose to use pvc pipe because of its durability but also because its cheap and easy to work with. A 10 foot length of 3/4 inch pvc runs $1.25 and fittings (90 degree corners and three way Ts) ran 28 cents each. A small handsaw and a drill were all I needed to make it. The long lengths have a 1/8th inch hole drilled in the bottom of them spaced about 4 inches apart for drainage. I did not glue the pieces together, I found they held together very well with just pressing them in.
This is the front bed which I chose to put on either side of the fence since I’m planting tomatoes to either side and plan on using the fences to help support the plants.
Here’s the pipe once its buried and the plants are in.
Those are tomato plants to either side, a couple of pepper plants in the center, and carrots in the front, carrots and radishes in the back. On the sides are dill, basil and rosemary. Now that the bed is in I’ll be spreading out grass seed over the bare ground too.
A nice thing about pvc pipe is it makes a great trestle with some plastic clothes line for pole beans. Each trestle ran me under $10 to make and should have years of use.

The rabbits cleaned me out of lettuce last year so this year I fenced in that bed. They didn’t seem to like anything else besides the occasional leaf here and there. Notice that the holes in the blocks provide perfect support for the poles too. The front of the enclosure is designed to lift off for weeding.
I put a slight forward bend on the trestle because while this side of the apartment faces due south, and gets sun all day, the roof over hangs just enough that a vertical trestle would have been in the shade at the top few feet. And added bonus is that the fruit tends to hang straight down making havesting alot easier.
PVC will bend if you heat it with a propane torch but be sure to do it outside because of the fumes and wear gloves.
The other half of the bed is my one screw up from last year. I planted asparagus without doing my research. For those who don’t know, establishing a bed of asparagus is a multiple year job. First two years you don’t get much if any in the way of food out of them.

I had just two of the plants from last year come up, but those have done very well. The asparagus is the ferny looking plant in the bed. I’ve planted more this year, and those are responding well to the deeper watering via the pvc.
Those are cherry tomatoes in the back against the wall. They like to vine and climb so I replaced my cucumbers from last year (which didn’t do well) with tomatoes and I’m going to let them climb the shorter tressel.
Here’s a shot from the back of the apartment.
Its late in the day so I do get some shade then, but the rest of the day all the beds get full sun. You can see the one bed I didn’t finish last year, but will plant in this year in the foreground.
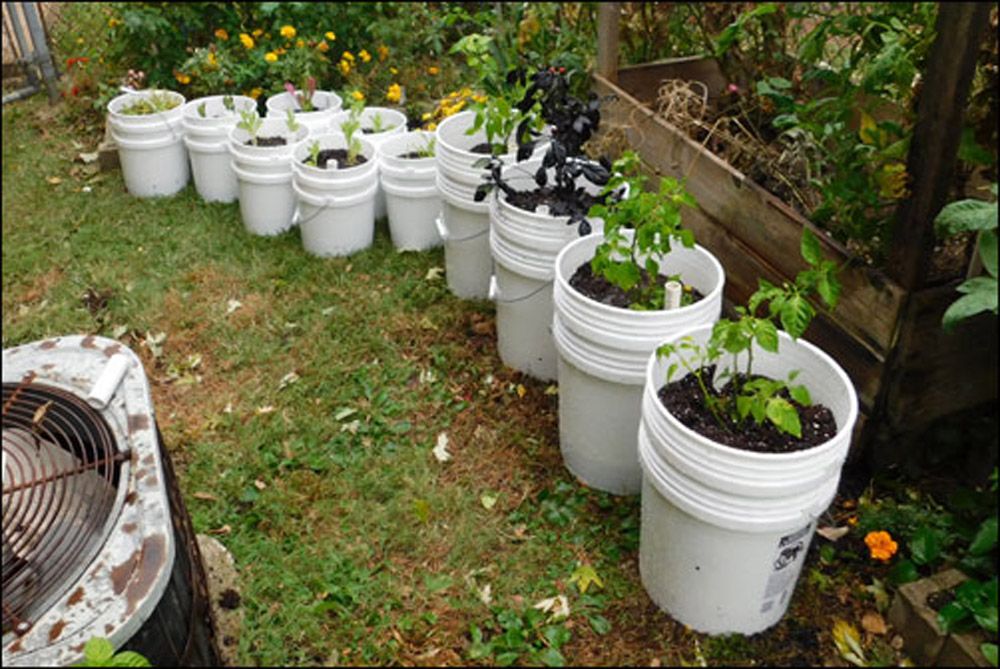
One addition this year is a vertical potato bin across from the air conditioner.

I’ve read up on these and it seems to be a good way to increase your yield in a small area.
For those unfamiliar with this method, you basically continue to add soil as the plants grow, adding boards as needed until you reach the top of the bin height and then let the plants set. In theory you get potatoes the entire depth of the bin. We’ll see if this works.
I’m using untreated cedar so the cost is a bit high, but I don’t have to worry about chemicals leeching into my potatoes
All in all with 4 beds and some containers I have about 125 square feet of garden, which while it won’t feed me entirely does help add to the table (since its just me), and it provides a way for me to learn from my mistakes now when I have the cushion to make them.
I have done a tutorial on how to make these raised beds with concrete blocks. You can find it here:
https://peakprosperity.com/forum-topic/how-to-make-a-raised-bed-from-concrete-blocks/
Some of you might have read my posts above about my garden building experience. Not long after that, I built an “E” shaped bed (about 17’ long with a 4’ wide bed in the middle prong of the E and 2.5-3’ wide beds at the top and bottom. The entire outside of the E has 6’ fencing that also serves as a trellis. The bed construction material - 4"x8"x16" concrete blocks just like dtrammel, but solid - no holes. They might be a bit stronger, but I like the idea of the holes for herbs and flowers, although I’d be concerned about keeping them moist enough in my well-drained soil. The blocks are cheap, easy to work with compared to locust and if they fall over during the winter as a few always do, just stand them up. The locust boards and fence posts have stood the test of time with no sign of rot six years later. On this side of the garden, I have drip irrigation line with 9" spacing between drippers with occasional additional drippers installed on little extensions of skinny connector tubing.
I’ll give more updates on my garden experience over the past 6 years with photos as time allows.
Adam has shown you what you can do with alot of property. I posted some ways to use even a few square feet of your yard.
But what if you don’t have any? Perhaps you rent an apartment or just don’t get much sun in your yard. Well there’s a way to grow things even when you are limited.
You can grow in containers.
Here is a tutorial on the ones I use, though Youtube literally has thousands, from the smallest to the largest.
Self Watering Garden Containers