
 My garden is really starting to cook. Did a raised garden in the front of the house with beets, bush beans and pole beans, growing well. On the back side our above ground pool collapsed last year and the deck makes for a great garden area, fewer bugs and weeds. Lots of tomatoes, cukes, peppers, bush beans, and eggplant in the works. 9 different varieties of tomatoes.
 ![]() Have 2 different varieties of watermelon, cantalope, different lettuces, yellow and zucchini squash, etc, etc. Staying home gives plenty of time to garden. Nice to go out an pick fresh veggies. We use a lot of cilantro, must sow every week or two as it bolts quickly here. Love to read all the great ideas and see picks of other’s gardens. Thanks for sharing.
Have 2 different varieties of watermelon, cantalope, different lettuces, yellow and zucchini squash, etc, etc. Staying home gives plenty of time to garden. Nice to go out an pick fresh veggies. We use a lot of cilantro, must sow every week or two as it bolts quickly here. Love to read all the great ideas and see picks of other’s gardens. Thanks for sharing.
We have had a garden for many years, but are considering putting in raised beds this year. As I have done a fair amount of research on wood to use, I am getting a lot of conflicting information. Is it ok to use treated lumber for the beds, or should we be worried about chemicals leaking into the soil, and then eventually into the food that we eat?
AKC,
Untreated. Treated woods usually have been treated with arsenic, etc. From the website below:
“Untreated lumber is the closest you will get to all natural wood, unless you fell your own tree. Treated lumber is infused with chemicals to resist deterioration due to weather, rot and boring insects. The primary differences between these two types of building materials lie in durability and health concerns. While either type of lumber can be used in a project requiring wood, you may consider natural wood if the structure will be in contact with children, animals, plants or ground water.
Treated wood can contain arsenic, creosote or Pentachlorophenol (PCP). These chemicals can be absorbed through direct, repeated or extended contact and result in adverse health effects in humans, plants and animals. In fact, the USDA has banned many of the chemicals used in the treatment of lumber for any use that might harm humans, livestock, soil fertility or groundwater potability.”
https://www.hunker.com/13424557/treated-vs-untreated-lumber
For my raised beds, I use either cedar or juniper planks.
“Cedar, Juniper, or Pressure-Treated Wood: What to Use When Building a Raised Bed”
https://diy.dunnlumber.com/projects/cedar-juniper-or-pressure-treated-wood-what-to-use-when-building-a-raised-bed
Linda
why not? its much cheaper and last forever
I kept looking at other links, got reminded about being able to use redwood as well.
"But many gardeners opt for beds that are built with sides. These sides can be made of wood, stone or cement. It’s really a matter of what is least costly for you and what you have available.
Cedar is a great wood for raised beds because it is rot-resistant. Hemlock is a less costly alternative that also works well (my beds are made of hemlock). Juniper and redwood are other common wood choices. Do not use pressure-treated wood for your beds, as it may leach toxic chemicals into the soil.
Other options include concrete blocks, natural stone, or brick. You can also use boards made of recycled plastic like those that are used for decks and other outdoor structures.
You can also use bales of hay or straw as sides for your raised beds. The straw will decompose after a season, but you can move it to the compost pile and use new bales the next year."
https://www.thespruce.com/before-you-build-raised-beds-3016711
Yup, I've seen aluminum used. But, I try to use as environmentally friendly (local as well) as possible... I would think aluminum might have a larger carbon footprint too, and the supply chain for it could be an issue soon too.
"The Best and Worst Materials for Building Raised Garden Beds"
https://dengarden.com/gardening/The-Best-and-Worst-Materials-For-Building-Your-Raised-Up-Garden-Beds
This was interesting reading, but maybe more complicated (in my 20ft x 20ft garden pot, I use 4 foot long sections of either cedar or juniper which makes it easier for me to move them around, so I can make 4ft x 8ft long raised beds for a total of 4 beds with room to move around & an area for my blueberry bushes, medicinals, and plants for bee foraging) than what some people may be able to do..
Galvanized steel roofing panels with treated lumber frame: I’d started to see the Corten Steel planters all over Instagram—and while they are beautiful, their price and aesthetics aren’t quite right for our garden space. But they did give me the idea of using galvanized steel roofing panels! We used them on our chicken coop, and we loved working with the panels so much, that we knew we’d use them again somewhere. They are affordable, readily available, and beautiful! We started doing some research about using them as raised beds, and a number of people have done it, but because the panels are thin and bow when filled with soil, you need to build a full lumber frame (with supports inside) to support them. When we priced this out, it was barely any cheaper than the cedar route, it was going to take a lot of time to build the frames, and we still had the dreaded treated lumber touching our soil. Back to the drawing board.
Galvanized steel roofing panels with cedar and conduit supports: I refused to give up on the steel panels, so I kept Googling and Googling to try to find someone who had made a bed without the treated lumber frame. I landed on this post from the Prarie Homestead. They didn’t use a frame, but her beds use steel bridge decking, which is thick enough not to bow with the soil. The panels are not something you can just head to Lowe’s and pick up, and it’s not cheap. We nixed that pretty quickly. Then! Then! I found this post where they buried conduit in the ground to support the side panels, and then used 4″ x 4″ supports in the corners."
https://wholefully.com/raised-beds/
Linda
When I go into my new home later this year (or next if this pandemic thing keeps going on), I’m thinking seriously of making these concrete panels to do my raised beds.
[embed]https://www.youtube.com/watch?v=yuSBwFkCiAw[/embed]
aluminium instead of wood?It would probably be cheaper to go with galvanized steel sheets than aluminum but metal lined wood frame raised beds would be a good option. In theory you could then use treated lumber for the frames, though I would still worry about minor leaching into the ground around the beds getting into the plants. I went with the concrete bricks because I could easily carry them (not an unimportant factor at my age), they were cheap and adaptable for several sizes. ADDED: Linda beat me to it, lol.
I have used treated wood to build my raised box beds for vegetable gardening. The kind that you can buy retail for residential use from the big box stores will probably have been treated with ACQ or CBA, both of which are copper-based, and neither of which contain arsenic; the industry stopped using arsenic in residential treated wood products in 2004 in the US. The amount of copper that would be leached into the soil is negligible, and most people consider it safe for this application. (e.g. see https://laidbackgardener.blog/2017/06/25/is-treated-wood-safe-in-the-vegetable-garden/) Of course, if this would cause you to lose sleep, by all means use an alternative. If you need to grow vegetables which are certified organic, you can’t use treated wood that is in direct contact with the soil (even though the linked web page mentions that, ironically, there are some copper-based pesticides that are approved for organic use that would introduce far more copper than would ever come from treated wood).
Thanks for the information Graybeard and welcome to the Peak Prosperity community.

I’m an apartment dweller, but that’s not stopping me! Thanks for the content, Chris.

 Thanks for the constant encouragement Chris, I finally took a couple of hours today and got about half of what I plan on growing in the garden. It’s a little early yet up here in Mn., but if we get another cold snap I can just plant some more seeds. I’m going to hold off on the peppers and tomatoes for another week or two anyway. In previous years I did as many as 48 tomato plants, which I don’t think I will do this year, but I will have at least a dozen. Also peppers, potatoes, peas, lettuce, spinach, onions carrots, green beans, radishes, cantaloupe, squash, etc. Keep up the good work keeping us all informed!
They haven’t used arsenic in well over a decade if I’m not mistaken, and yes I use treated wood as well, have for years!
This “Oldcastle planter wall block” system, sold by both HD & Lowes, gets you to a raised bed very quickly. Same visit I bought 4 pieces of 3’ rebar to drive through central holes in corner stacks for added strength.
https://www.lowes.com/pd/Oldcastle-Planter-Wall-Tan-Retaining-Wall-Block-Common-6-in-x-8-in-Actual-5050-in-x-7-75-in/1001156396
Note in picture I used 2x8 instead of recommended 2x6 to get some interlock between side boards & blocks. This resulted in 2’ side. Easier on my back and more fill dirt, but your call.
Same visit I bought the pressure treated lumber for the sides. (No toxic chemicals used in this since 2003 - be careful of reusing old lumber.)
Using standard board lengths, or straight cuts made for free at HD/Lowe’s, the bed went together in a couple of hours. Measure layout twice, install once. ![]()
Good Luck!

We just took the plunge. These are stacked cedar 2x6’s and corners from Amazon with a single screw at the top of each for added stability. We filled it with Miracle Gro raised planting bed mix, not knowing any better. This is our first experience with dirt and the bride is much more excited than she ever was with our aeroponic tower gardens. You can take the girl out of the Wisconsin farm . . . .


They get full sun until noon and partial after that. South Florida summers being so murderously hot we’re thinking that’s the play but we’ll see.
Let’s see if I can get photos here. If so, here is the latest raised bed being built, this one is 10ft by 4ft as I had 10ft wood laying around, the majority of the layout is 12’ by 4’, all are 1 foot deep and have gopher wire secured on the bottom. On this one you can see that we havent nailed down the wire yet,a nd you can see the spot in front where it is going to go. This new bed will be planted with sweet potato slips, which I am potting out inside and growing some, waiting for summer weather, I started the sweet potatos in water to get slips months ago.

I cannot get a picture off all of it at once, but there are 14 beds, most 12ftx4ft, so each bed is right under 50 sq ft.


Potatoes are planted 1 ft aprt, and 9 inches deep, so 48 potato plants in each bed, right now there are 3 potato beds, these 2 beds were planted 5 to 7 weeks ago, mostly yokun gem and yukon gold, from seed potatoes saved from last years crop, but half of the fore bed is red norlands bought as seed this year. The third bed was an after thought planted later and just coming up, about 2 or 3 weeks along. All of the potato beds should be done mid summer, and these 3 beds will be replanted with short season dry corn, magenta parching, which I have grown before, and I hope some potatoes will get replanted, if I can get them to grow in the heat ! but I would like to see if I can get 2 crops of short potatoes.

Onions and garlic. The onions are in late, but should be ok, had a cold wet early spring and alot of predators kept pulling them up. The onions were started from seed after new year holiday, new york early and newburg varieties.

Then, this bed is winter/spring vegtables, the kale is just starting to bolt, the over wintered brocolli survived and I am about to harvest the main head, side shoots are forming. Sugar snap peas were transplanted out this week, as well as the other transplants, now that we have killed off some of the bunny predators, and the first try of direct seeded sugar snap peas rotted due to a cold snap. The transplants are doing great. A hint is to start them in a seedling flat, not six packs, you get longer tap roots that way, alittle harder to transplant with long roots, but they grow better. there are carrots, lettuce, brocolli, bok choy, radishes, comapact cabbage. Most summer greens will not be in the official beds, I have transplanted chard to the ends of the beds, and magenta spring lambs quarters will also be at the ends of the beds ( both on the outside) as well as flowers

Here are the peas pricked out from the seedling flat and ready to transplant

and the almost empty seedling flat. The little tool up top that I used to prick them out, and also used to make deep narrow holes to plant them is called a widger, but you could try an old butter knife in a pinch. This seedling flat was also used to start the onion seeds earlier.

The heavily mulched bed to the left is 48 seascape (everbearing) strawberry plants, planted out in Feb or March, I have wire over it temporarily as this bed was hit heavily by bunnies, it was how I knew we had a problem, but they are bouncing back. I have grown this variety here before, does well, to bad about the set back though because usually we should have first berries lat May, and now that will be delayed

We went with untreated and painted them. Treated can get pricey too.
Standard 8x8x16 cinder blocks around here are all sold out.
Best is to use a wood that is naturally resistant to rot from moisture, out here that is redwood, but Osage Orange or black locust would be better, cedar is good too.
The year I was broke and put in 4 raised beds made from fir is why they had to be taken out and replaced too soon,
I would not use treated wood.
The other thing to do is to clear away the dirt on the outside of the beds that always gets up against the sides over time. Keeping that outside not under the dirt realy helps
I did not make all my garden beds the same year, I started with 4 beds then added another few or more each year
If you can use your native soil as a bse, assuming you have any top soil, that is best. The bought soil doesnt seem to have as much actual mineral dirt as I would like, so it decomposes and sinks too soon. If you want to use your native soil, and need raised beds ( because of gophers, like out here) you can take the level of the garden area down by 4-6 inches or so and use that to fill the beds, then add organic matter and soil ammendments to the native soil to improve it. If you can do this, you will usually end up with better soil. Look at How to Grow More Vegtables… for basic things to add, or better yet do a soil test, add the correct amounts of blood meal, bone meal, wood ash, crushed granite, for example. Then, you also add if needed for Ph balance or texture things like compost to get enough organic matter in there. Over time the soil will improve
When I was first planting onions in my garden, I used what is called “onion sets”. These are onions which are grown from seed and allowed to reach a thumbnail or so size before being taken out and dried. These proto onions can be stored for a while, then when you are ready, planted.
The problem I had was that often they would all sprout. Perhaps 8 in 10 or slightly less. Normally not a problem in larger gardens, in a small one like mine, where every inch is critical, this can sometimes leave big holes in your square footage.
Replanting with new sets doesn’t always work. The new plants can be over shadowed by other plants in the garden. I typically plant my onions early to give them a head start, and they like cooler weather too. This way when later plants that are low to the ground, like squash spread, the onions have enough height to still get plenty of sun.
So what I’ve been doing the last few years, is prestart those sets indoors. I did that this year, but didn’t get any pictures.
I did decide late in the season to try my hand at some potatoes. This was because I bought a bag of small potatoes from the grocery and forgot to eat them before they sprouted. I’m going to try them both in one of my raised beds and in container for an experiment and comparison.
Like most people who buy their plants from stores, I get some of those plastic 6pack flats. These typically have holes in them to let water drain. These are great for starting plants but you need a couple of additional things.
Go to a organic/hydroponic store and buy some of their starter flats, the kind with the clear dome top. Get the ones without the holes in the bottom. They run you $7-9 with lids. The useful thing is the ones you get with your plants at the store, are slightly smaller than these.
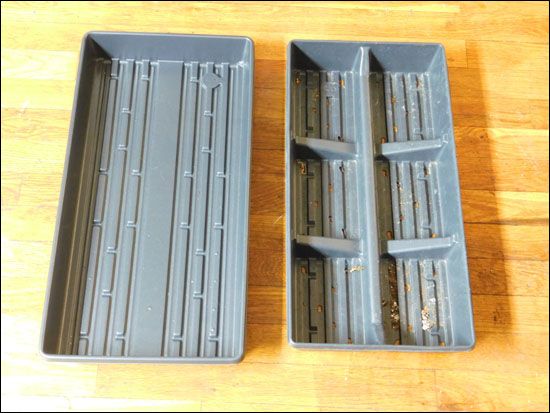
The larger flat provides a water reserve for the sprouting plants.
I did that this year for my potatoes, placing the halved sections that had eyes forming, into each section on a bed of paper towel. This was to prevent the rootlets from growing under the flat.
Here are two picture of the potatoes after a couple of weeks.
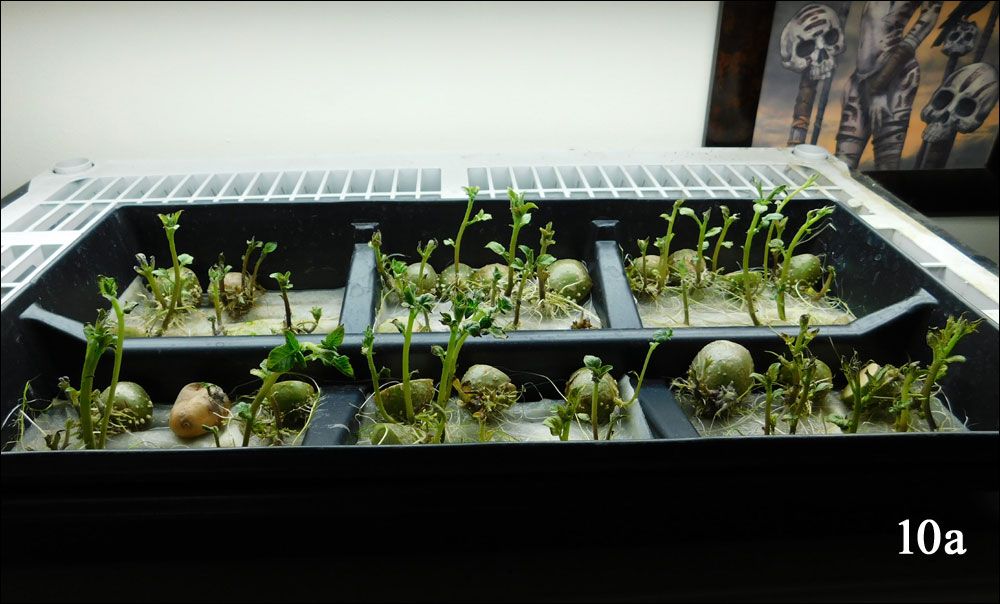
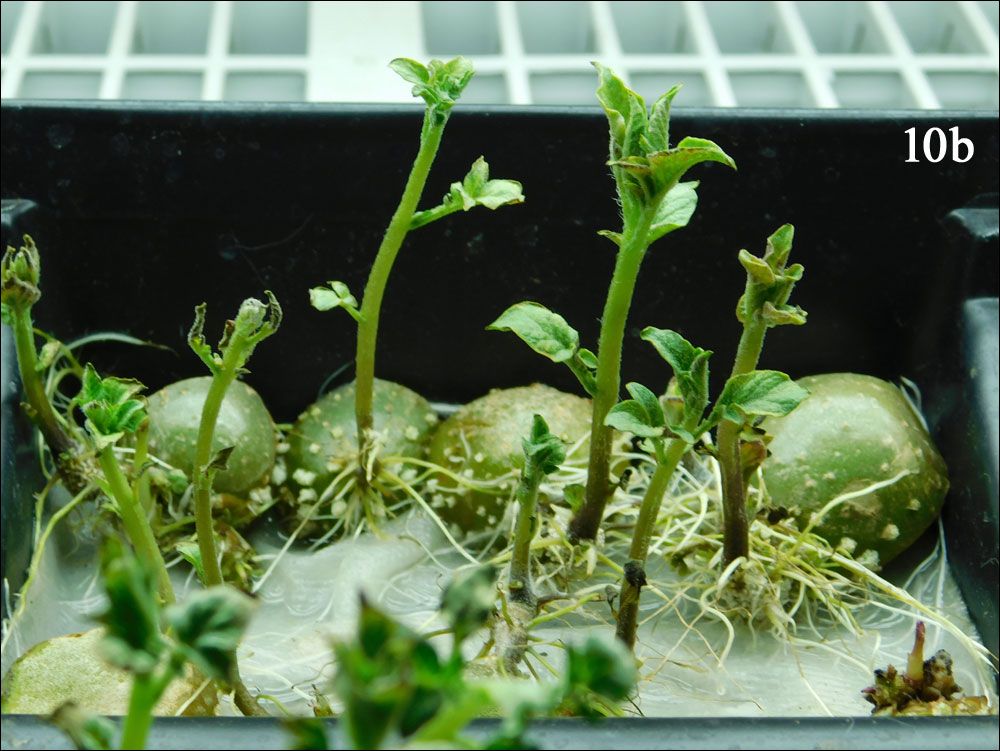
Now you can put the flat under a grow lamp like I do. Or put it somewhere that’s warm and sunny. They will sprout but get long and thin quickly, so if you don’t use a lamp, be prepared to get them into the ground quickly once they do.
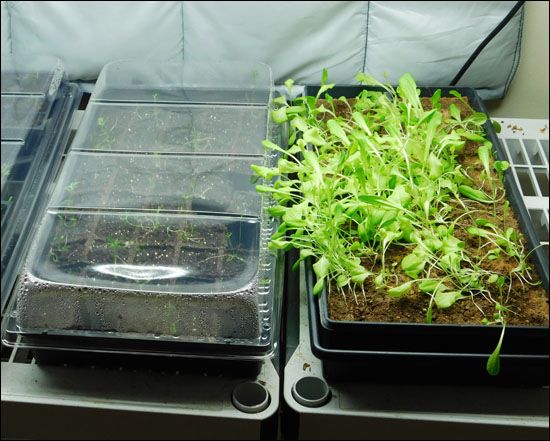
You can also use this technique to grown micro greens, just fill the upper flat with soil. Or reuse the 6packs you get with store bought plants, or the cardboard 6 packs you can buy to seed start. The lower flat acts as a water reserve and keeps all of the soil and packs consistently watered, unlike watering from above.
Ok, hope that gives you some ideas for next year.
ADDED: The painting in picture 10a is from my collection of sci-fi and fantasy art. I’ve been a collector for about 4 decades and have a small but very nice collection.