Thoughts on increasing our gardening resilience
By: George Galpin
It feels like the world is moving faster and faster in directions I never would have thought possible just a couple of years ago. We knew resilience was important, but now it has become essential, critical to our well being and perhaps even survival. I am going to share some thoughts about pushing a garden to be more productive in ways within the capabilities and finances of most of us. My solutions reflect my agricultural zone (8b) and microclimate, but it is surprising what can be accomplished with very little.
Three resources I lean heavily upon, and will reference here, are: the books written by Eliot Coleman (Maine), Lynn Gillespie’s courses and information found at thelivingfarm.org (Colorado) and the interviews with Singing Frogs Farm (California) found on this website. All three provide a wealth of ideas and processes that those of us growing in residential areas can adopt on a “micro-sized” basis to be quite successful.
It takes knowledge and experience to be successful growing food on a small lot in a residential area, year-round, but it can be done! We can get a general idea of what we need to do through resources like those mentioned and seed company charts, but only dedication, season after season, brings us the knowledge and feeling that we need.
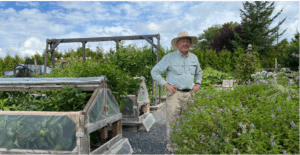
In the garden with the mini greenhouses with peppers and an A frame trellis for tomatoes behind
My garden is about 2000 square feet of actual growing area. It is divided into 40 beds, most of them raised. In this area over the course of a year 140 varieties of 40 vegetables and at least 20 different herbs are grown. Scattered around the rest of the property (a total of about 2 acres) we grow 15 different berries, 10 varieties of grapes, and trees for plums, peaches, pears, apples, cherries, hazelnuts and almonds. We have also been planting hundreds of pollinator friendly plants to support our own bees and as many beneficial insects as will come and visit. And we have a couple dozen chickens.
I think of this more as a “mini urban farm” than a residential garden. It is a place without commercial output, but knowledge is shared by working example among friends and neighbors and the broader community. The goals are straight forward: we want to grow as many things as we can, for as long as we can, while being as efficient and productive as possible.
The plan is basically in four parts: a bountiful summer garden, cool weather crops for fall and late fall, crop varieties that can be grown during the winter itself, and simple storage in a small barn for varieties that keep reasonably well after harvest in a cool, dark place.
In practice this means growing almost everything over the summer, with warm weather crops like green beans, corn, cucumbers, peppers, melons, tomatoes and both summer and winter squashes concentrated in the warmest months and cool weather crops fore and aft. Starting in about mid-July we begin planting the cool weather vegetables for fall and winter. Some of these, such as carrots and beets and the potatoes started back in March will be available to eat all fall and can be held and harvested directly from their growing beds into March of the following year. We have found covering these beds with a poly tunnel to keep the winter rains off significantly minimizes spoilage and avoids problems with freezing. These crops must reach eating size in the fall since they will stop growing by mid-November.
Other vegetables like Swiss chard, collards, kale, and leeks seem to hold well through the winter period into March with little or no protection. They suffer in a cold spell but are very hardy and bounce back quickly.
The growing effort over the winter is focused on Asian greens, green onions, cress, claytonia, and brassicas like kohlrabi, cauliflower, and cabbages. These are grown in passive protective structures, a couple of 8x12 foot walk in wood and poly greenhouse looking creations, a couple of 3.5x12 foot structures that resemble a mini greenhouse, and some poly tunnels.
In February some of these winter crops begin to be replaced with beets, spinach, lettuce, carrots, new brassica starts and snow peas that will be fully grown and harvested before the structures are needed for setting out the peppers, tomatoes, and cucumbers around the first of May.
The final part of the program is the storage of things like winter squash, onions, shallots, garlics, some potatoes, and dried herbs. These are harvested over the summer and fall and after 3-10 days of drying in the sun are set in the barn in a cool, dark place. There are no temperature controls, but the barn keeps them from freezing throughout the winter. We have issues with slowly increasing spoilage, but we grow enough winter squash to eat all the way until May. Some of the garlic and shallots survive that long as well.
So we have fresh food to eat all year long, just no green beans, asparagus, or ripe tomatoes when they aren’t in season. If I had plenty of room in my condo, I would use a freezer and maybe do some canning but eating fresh with the seasons works quite well. This is a simple system with a path well blazed by many others. All the effort is really about learning to go both backwards and forward at the same time, relearning the skills our great grandparents took for granted, but without the benefit of a root cellar, and learning how to use things they never had like greenhouse poly, hoops, and frost protection material.
RECORD KEEPING
I have found a surprising amount of benefit can result from good record keeping, thoughtful garden layout, and the potentials for flexibly constructed, “micro-sized” protective and trellis structures. I focus mostly on these areas, the improving of my soils and the specifics of my crop rotations. I still need certain inputs like seeds, fertilizer, growing lights, irrigation parts, lumber, screws, shading and protection materials and greenhouse poly, and all of this requires more than a little work. Taking care of the garden and our fruits, berries, and grapes is about the equivalent of a full-time job for one person, but we feed 8 people directly and give about 1000 pounds of fresh produce to our local food bank every year.
Detailed, written records are critical. The information we keep must be in sync with the gardening goals, targeting the specifics of what we need to know to be successful. It must also be easy to reference and easy to use. My goal is a large matrix that defines the entire year: all the planting, harvest dates and their durations, when and what needs starting under lights, soil amendments for each bed, the moving of garden structures, and the crop rotation and seed planning programs. This is a lot to know, and it takes time to learn, but perhaps we should all be doing this.
All entries of every kind are written down in a general ledger in summary form, day by day as they happen. The specifics of most entries are then recorded in notebooks related to the starting of seedlings under lights, the activities specific to each garden bed, and the activities related to each vegetable.
In the late fall or winter, I record on computer spreadsheets details relating to the soils in each bed, any tests performed, and soil amendments. I also record what has been planted where by crop family and from this create the crop rotation plan for the coming season. Seeds require detailed records as well, for those we raise ourselves, and for those purchased. We keep track of the source, dates, life expectancy, alleged growing periods, and how long the quantity on hand will likely last.
For now, the general ledger is where I go to keep tabs on things. At any time of the year a quick scan down the prior year’s records reminds me of the upcoming tasks and what I need to be doing. Ultimately there will be a complete matrix with all the tasks detailed by date.
THE DETAILS
Specific information about almost everything can be found in the sub accounts. We start most plants from seed, under lights on benches in a 10-foot square room in the barn. It’s a very simple setup with growing lights, a couple of heat mats, timers, humidity domes, trays, and hundreds of various sized containers. A small electric heater maintains minimum temperatures at about 55 degrees and a fan and windows keep the top end about 75. The lights are on 12 to 16 hours a day when in use. Our seed inventory printout is taped to the walls as is a large, erasable map of the garden that shows the current crop rotation.
In the seedling notebook we record the starting dates, transplanting and fertilizing dates and when plants are set out in a greenhouse or cold frame to begin hardening off. Notes on each variety are recorded in the notebook for vegetables and when anything is planted out to the garden itself there is an entry in the notebook for garden beds recording the specific location. This last piece of data will be summarized about twice a year on a computer spreadsheet that records the sequence of everything planted in each bed.
If you were only to keep one set of records, probably the sequence of everything planted in each bed is the most important. This becomes the basis for a successful crop rotation plan that is vital to the overall health of the garden. Eliot Coleman claims that the vast majority of our problems can be solved with good crop rotation and in his books offers example solutions for 8- and 10-year cycles.
I follow his suggestions in a general sort of way and try to maintain a sequence of 8 crop families wherever possible. I maintain the sequence as best I can, rotating through 8 crop families for each location regardless of time it takes to do so. We are now in our 6th season of doing this, our plants are healthy and pest problems have practically disappeared. So I am a believer.
THE SOIL
Part of our gardening success is clearly the result of improving the soil in each bed. Each spring, and during the year when necessary, we add compost and other soil amendments to every bed, about 10 cubic yards in total. This may be as simple as a wheelbarrow of our own compost and some organic fertilizer to a single bed, or a mix of imported compost, sand, and even peat, and sometimes includes amendments such as zinc, copper and boron determined from soil analysis. The specifics of this are recorded in the log for each bed, and once a year are added to a spreadsheet saved on the computer that keeps a permanent record.
We used to purchase the local nursery’s best four-way mix when building new beds, but we have found this soil is basically dead. Our plants don’t like it. Now we are using Lynn Gillespie’s recipe to build our own soil from a third each by volume of the best compost we can find, sand, and either peat or coconut coir. This makes a nice sandy loam that is wonderful to work in, our plants like it, and our root crops hold very well in it through the winter. This approach can save a lot of effort over the long run.
Sourcing the compost is the most difficult part. Unless you personally know the source, it is hard to be sure about things like antibiotics, glyphosate, or other unhealthy residues. It would be nice to be able to make all our own, but sufficient quantities require livestock we don’t have, and we are short the other materials as well in any event. We continue to look for a good solution.
THE VEGETABLES
Our vegetable notebook is organized first by vegetable and then by the specific variety. We always do our best to record the seeding date, the planting out date if transplanting, and the first pick and the end pick or pull date (usually when the plant is cut off at ground level). This provides the details for growing days during different parts of the season and for the length of the harvest period, some of the most critical planning data. It is important to keep track of specific varieties as their expected maturity times will be different and these differences are accentuated when growing in the cooler seasons. These differences become an important part of the crop plan and therefore an important variable when ordering seeds.
A few years back, I thought resilience could be increased by going to all open pollinated varieties. While this seemed like a great idea, it is hard to escape the advantages offered by F1 crosses: they often grow better, are more disease resistant, and in many cases, frankly, taste significantly better. We try to balance the potential unavailability of the F1 crosses against the problem that varieties of a particular vegetable cross pollinate. This means plants grown to generate seeds need to be well separated from other similar varieties and we have only very limited ability to do this. We therefore settled on a plan that is about an even mix of open pollinated and F1 crosses for each vegetable. With good seed records we believe this will work.
URBAN TROUBLES AND SOLUTIONS
Our location is in an urban area, so we must thread our way through regulations designed by people who couldn’t care less about a garden, and this can be quite frustrating. If we were a commercial operation almost anything would be possible but being residential it often seems like everything we want to do is illegal. There are issues with setbacks, building permits, height restrictions and the number and type of structures. We can have one greenhouse, for instance, but it will require a building permit, location within setbacks, and must meet state regulations for wind and snow loads. Many don’t have the money for this, so our efforts are focused on what is possible in the “wiggle room” of the ordinances.
Fortunately, there is usually some “wiggle room” most of us can utilize. In our area we can build almost anything we want as long as it is under 120 square feet and not higher than 8 feet and does not need electrical power or plumbing. This is the world of “micro-sized,” movable structures. As long as the structures are small, don’t have permanent foundations and are moved we are reasonably free to do with them as we wish.
What we are allowed to do in the “wiggle room” is only one of the important pieces we should spend time thinking about before we lay out a garden. I am going to share a few thoughts that I believe can make things easier.
BUILDING BEAUTY INTO THE DESIGN
The single most important criteria that I have for a garden is that it must be beautiful. This is clearly personal, but beauty and function go well together and affect all of us on many levels. I must want to be in the garden and enjoy being there; it must bring peace to my spirit and be a place of refuge. The garden must keep me connected with nature, and I want everyone helping me and those who visit to feel this connection as well. I believe the peace, beauty and bounty of the garden should be contagious and inspirational to others and hopefully encourage them to follow in whatever way they are able.
One of the most fortuitous things that happened when building out the garden resulted from the need to be very efficient with the lumber purchased to build beds. Quite of few of the beds have identical dimensions, and even the ones that do not usually share at least one common dimension of 6, 8 or 12 feet. In practice, what this comes to mean is that almost every single structure built for the garden can be moved almost anywhere or put together from interchangeable parts in a variety of ways to accommodate whatever the need, wherever needed.
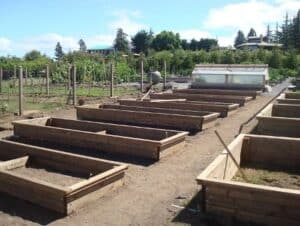
Building out an addition to the garden 4 years ago
This is a very simple and obvious idea with tremendous benefits. If I were designing a new garden layout this would absolutely be a core principle – the whole garden would be built around the idea of making all the beds a uniform size or at least commonly divisible in some sensible way. Everything from irrigation parts and systems to protective structures and trellis requirements would be modular and able to go anywhere at any time. This would make things so much easier and save much real time and effort. Fortunately, the garden is reasonably close to this solution, albeit by accident.
For residential areas where space is a real constraint, raised beds are advantageous for many reasons: they are more productive, we can fill them with soil we make ourselves, they are easier to weed, and as we get older (I’m 74) a little height above the ground makes working in them easier. Unless we are very fortunate, our native soils, particularly those around a house, are likely to be very poor and need constant amending for years. That can be very frustrating and becomes one of the key reasons people simply give up.
For raised beds, a useful guideline in sizing the garden is that 200 square feet will likely support all the vegetable requirements for one person for a whole year. This assumes they are located where they will get sun, so we must understand how the altitude and azimuth of the sun changes over the seasons. A bit north of Seattle where my garden is located, the sun swings through an arc of only 108 degrees and rises just 19 degrees above the horizon on the winter solstice, so our winter shadows are very long and make about half my growing area unusable.
IRRIGATION
As the garden gets larger, we need some form of automatic irrigation or we will be spending all our time dragging hoses around. I built a drip system that divides my 40 beds into 5 zones run by battery powered controllers to solve this problem. It was a little intimidating starting out because I knew nothing about how these systems work and all the options and different manufactures seemed overwhelming. But the truth is these systems are remarkably simple, require only a few inexpensive tools, and assembly doesn’t require any special skills. The manufacturers have plenty of diagrams and often videos as well to help. All of us, with just a little effort, can become quite good at this. This method is efficient with our water and plants like it.
In retrospect, I wish I had installed a shutoff valve for every bed. Some of the beds have different soils that take on and hold water differently so can get too wet or too dry, and sometimes the water for a particular bed just needs to be off. It would only have cost about $5 more per bed to have done this everywhere to begin with and would have been so much easier.
Also: it would have been a very good idea to install any piece of equipment that could possibly fail with union couplers. The control valves for each zone will almost certainly fail at some point and a couple of my valve boxes will have to be dug up and completely rebuilt when that happens. With union couplers a failed valve could be quickly disconnected and replaced. Plan for failure!
MINI GREENHOUSES
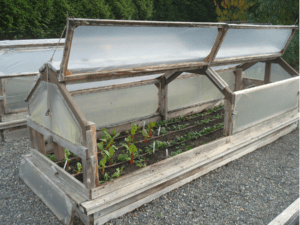
One of my first and best “micro-sizing” ideas was to create a couple of “mini greenhouses” that perfectly drop into place over 16 of my 12x3.5-foot rectangular beds. They have top vents, end vents, roof panels that are hinged and can be held up by a short cord, and side panels that can be removed. This makes for unrestricted access to the growing plants when required and everyone finds the design very user friendly. The one construction mistake was not to run a wire over the ridgeline to keep the crows away as they have pecked numerous holes in the top vent panels. Alternative versions of these are on the drawing board, mostly with larger volume but smaller footprints to keep moving easy.
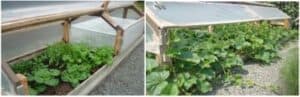
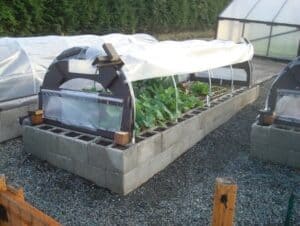
Mini greenhouse with Asian greens in winter with the far half utilizing the addition of a PVC frost protection structure. Additional frost protection proved unnecessary in zone 8b. On the right, mid-summer melons creating a jungle.
These mini greenhouses can be picked up and moved by a person at each end. They are now moved 3-4 times a year to protect things through the coldest parts of the winter, then to provide early protection in late winter to things like brassica starts, and in the spring and summer they are home to some of our peppers. Once the pepper plants are about 18 inches tall the roof panels are removed to avoid restricting growth. A near perfect microclimate for the peppers is the result. Alternatively, the top panels can be left in place and the sides removed during the summer to provide a nice growing environment for melons.
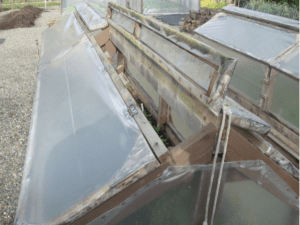
The 8x12 foot greenhouse structures I have built are made in 5 pieces and held together by only about 40 screws so I can take them apart and change their locations if I wish. They have permanent top vents just under the ridgeline that are partially blocked off with a piece of plywood during the coldest part of the winter. As the season warms, the plywood is removed, then the door is opened during the day, then tied open permanently, and finally when summer arrives the sides are partially rolled up as well. I wish they were substantially bigger and had taller sides, so I didn’t hit my head as often, but they work well and are within allowed limits.
These greenhouses are moved once a year to an adjoining bed with winter plantings in early October. They are moved on rollers (short sections of 6-inch PVC pipe) and the side of the greenhouse that will be passing over the new plants in the adjacent bed can be removed to facilitate this process. Cool weather crops grow in these structures until cucumbers, tomatoes, and peppers go in about May 1st. The following October the move is repeated but in the opposite direction. One could easily adapt this idea to a system where the greenhouses can be moved over multiple beds each season and that is part of my expansion plans.
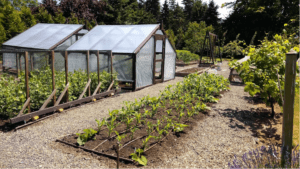
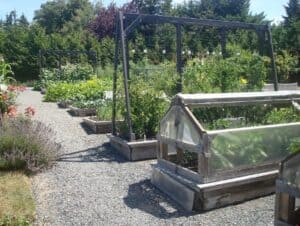
Early June. One version of the pea trellis setup on left, greenhouses with cucumbers and tomatoes, corn and squash in the near bed and an A frame trellis for cucumbers in the background. The greenhouses will move over the bed with the peas in October to protect Asian greens planted in September.
TRELLIS SYSTEMS
I have over 20 trellis parts, made with cedar frames, plywood gussets at the corners, and either a 2x4 inch wire mesh or 6-inch square concrete mesh. The 2x4 inch mesh is used for peas and these are sized 4x8 feet but can be extended with 4-foot square sections with a couple of screws to accommodate a 12-foot bed. The base structures and braces are the same regardless and made from 2x4s. The trellis parts are bolted to the 2x4s and the braces to keep them vertical are screwed into place.
The concrete mesh trellis parts are 8 feet long and either 2 or 4 feet wide. They are used vertically in A frame trellis systems for growing cucumbers and tomatoes outside during the summer, or horizontally attached to the roof beams in the greenhouses to support cucumbers. The 2x8 foot size also works wonderfully well for pole beans with two pieces tied together at the top and the bases anchored a few feet apart.
Most of these trellis parts are moved during the summer growing season wherever needed and during the winter they are stored in the barn loft along with the garden’s decorative obelisks. Building these things is more expensive than one would guess, so proper storage is important to extend their lifespans as long as possible.
OTHER STRUCTURES
The other structures used in the garden are light PVC frames for frost protection or sunscreen materials and poly tunnels made with half inch electrical conduit tubing and plywood ends.
The PVC frames are made from a variety of fittings designed for making furniture. Amazon lists a large selection of these to make most anything with common sized PVC irrigation pipes. The fittings push together and pull apart and a big box of fittings and precut lengths of pipe allow one to quickly assemble a protective structure or trellis frame for almost any location. Frost protection, bug protection, or different grades of sunscreen material are clipped to the frames with PVC snap clamps.
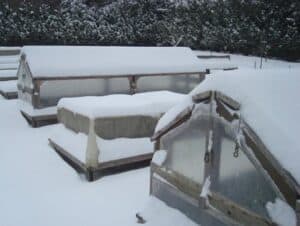
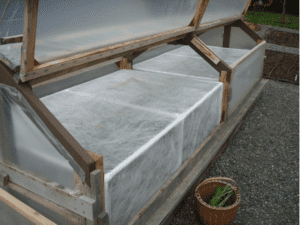
Mini greenhouses and PVC frame with frost protection material in winter.
Most of my PVC structures are 6 feet long and 3.5 feet wide with varying heights depending on what they are placed over. These are light, easy to move and used throughout the year, especially to protect new transplants from sunburn or to provide either single or double frost protection, the latter when they are used inside a greenhouse. High winds can blow these all over the garden, so they need to be anchored or weighted down during the windy parts of the year. Usually some board scraps are sufficient for this purpose.
I have made some poly tunnels that are placed over raised beds from late October into March. They have the advantage of being inexpensive to put together and create a waterproof cover for crops either being grown in the cooler months or to protect crops that are being held for as needed harvest over the winter. Rather than bunch the ends together and tie to a stake as one would in a field, these have plywood ends that provide control for ventilation and with the addition of drop in short pieces of wood sort of like the old TV rabbit ears the sides of the tunnels can be raised and held in place to allow reasonably easy access to the plants. I like the mini-greenhouse idea much better, but these are much less expensive to make.
Poly tunnel with side rolled up. Ventilation is controlled by the amount of exposed open area on the plywood ends.
FINAL THOUGHTS
I realize some of this seems like an awful amount of work, and it is. But if we just want to stretch our growing season and have at least some fresh vegetables throughout the year, then a few of the ideas expressed above will get us there with only modest effort and expense.
The real work part is mostly voluntary. It comes when we want to follow in the footsteps of a place like Singing Frogs Farm to stretch our own resilience. For this we need knowledge, lots of it, and we have to earn this and make it our own with our own efforts. If we have many ideas and run a lot of experiments, knowledge piles up fast. And right along side this comes a paradox: the more we know, the more we realize we will never know. That’s what kindles passion and makes life interesting. Every day there is something new to be discovered, new ideas and inspirations, better ways of doing things. This never ends and before long we have a beautiful and productive garden. Visitors go bug-eyed at the abundance and the demonstration of what is possible, and resilience for all of us takes another small step forward.
Mid-summer
APPENDED BY REQUEST OF GEORGE GALPIN ON 11/10/21
More on Mini Greenhouses
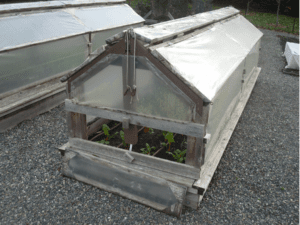
These structures were designed to fit on top of raised beds that are 12 feet long and 3 ½ feet wide. The corner posts are made out of 2 foot pieces of 4x4 (so they use an entire 8 foot post). Total height is about 38 inches. The end and center support pieces were actually originally the apex pieces of roof trusses made for a chicken coop I was building that I discovered exceeded the legal 8 foot height requirements of our local ordinances. So the roof angle is the result of salvaging these parts and not the result of an actual design.
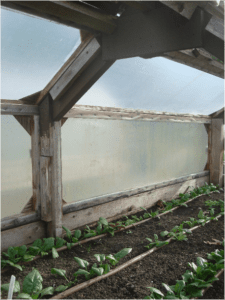
The pictures give a good idea of how the structures are constructed and used. They have 6 inch wide vent panels on either side of the ridge line that can be closed or opened to a desired amount using a couple of small blocks of wood as spacers. The main roof panels are hinged to a 1 ½ inch x 1 inch piece of wood and can be held upright by permanent cords with small clips that attach to a screw-eye located in the lower corner of the top panels. Plywood gussets hold the triangular roof support pieces together and, in a notch, hold a slightly cut down 2x6 ridge pole. Plywood gussets are also used at the corners of all the panels.
The main idea of the design is that between being able to raise and hold the roof panels in place while removing the side panels one then has unimpeded access to at least the center of the bed….nothing to hit your head on or require twisting yourself into an uncomfortable position. This makes working in the beds very easy.
The side panels sit on top of a 1x4 board that runs the length of the greenhouse, and the panels simply butt up against blocks of wood screwed to the corner posts and center support. They are held in place with the wood “buttons.” The panels are about 19 inches wide (same for the roof) and are 6 feet long.
The ends of the greenhouses have a removable vent panel, which is only put in place during the coldest months. The horizontal board above these end panels is where the structure is lifted for moving.
The panel material is greenhouse poly guaranteed for at least four years. These are in year six now and still doing well. We don’t get very intense sun north of Seattle, so I expect the poly to last quite a while. The poly is stapled in place using an inexpensive electric staple gun I got at Home Depot.
These pictures are of my generation 1 design. There are some important changes in my plans for gen 2. I am going to eliminate the top vent panels to simplify the design and will replace them with small vents up high on the greenhouse ends. I will eliminate the 1x4 boards currently used to rest the side panels on and instead use a 1x4 cedar board that lays flat and forms a bottom plate all the way around the structure. This change will allow one to actually sit on the edge of the bed while working and that will be very nice. The gen 2 design will have taller sides and a horizontal piece running the full length of the greenhouse, but this piece will be above sitting height to avoid restricting movement. The side panels will be removable as on gen 1 but the top panels will either be screwed in place or removed completely during the warmest months (as I do now for growing peppers). The top panels will not interfere with working in the bed so don’t need to be hinged. Because the gen 2 will have higher sides, I will shorten the design probably to 6 feet in length to keep the structure movable. One of the advantages of the higher sides will be the ability to grow determinant tomatoes in the structure. It will also be easier to insert PVC framed frost protection panels.
I wish these things were inexpensive to build, but even 6 years ago the materials for each mini greenhouse ran close to $500. You would never guess that looking at them, but cedar is even more expensive now. But they have been wonderful!
George
This is a companion discussion topic for the original entry at https://peakprosperity.com/increasing-our-gardening-resilience/
