Goats were one of the very first domesticated animals. They have been used for milk, meat, leather, fiber, manure, and for pack animals. Goat milk is easy to digest, and is often consumed by those that cannot tolerate cow milk. In much of the world, it is goat milk and cheese that is preferred over cow milk products.
In this article we will go through the simple process of making Chèvre. Chèvre is simply the French word for goat. It is a fresh, soft goat cheese, with the consistency of cream cheese. It is extremely easy to make, and a great beginners cheese.
Equipment and Ingredients:
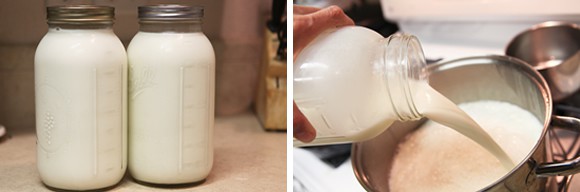
- 1 gallon of fresh, raw goat milk
- Thermometer (if using refrigerated goat milk)
- Colander
- Butter muslin (a very tightly woven cheese cloth)
- Large Stainless steel pot with a lid
- A stainless steel stirring spoon
- A set of measuring spoons
- A small glass jar or glass
- Chevre starter culture (a product that includes both the culture and rennet in an easy to use, pre-measured packet – see resources)
OR - Mesophilic culture (see resources)
- and Rennet (see resources)
Method:
- Sterilize
Sterilize all of your equipment. Our preferred method of sterilizing involves putting a couple inches of water in the bottom of a large stainless steel pot. We then add the stirring spoon, the end of the thermometer, a small glass jar, and measuring spoons. Boil for 10 - 15 minutes. The steam will sterilize the pot and the utensils. Allow to cool completely.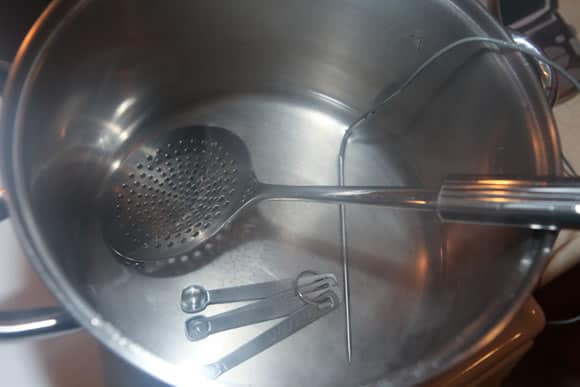
- Warm the Milk
Over low to medium heat, gently warm 1 gallon of fresh goat milk to 86°, while stirring constantly (heating the milk to 86° will maintain a raw cheese final product). Remove from heat and move on to step 3 unless you prefer to pasteurize the milk. (If we are using fresh milk from the morning or evening milking, we will skip this step entirely as the milk will already be warm.) If you prefer a pasteurized final product, heat the milk to 145° and hold it at that temperature for 30 minutes. Remove from heat, and cool the milk quickly by placing the pot in a sink of ice water. Cool the pasteurized milk to 86°.
- Add your culture and rennet
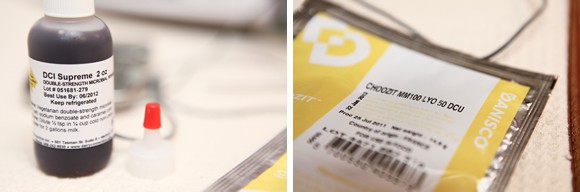
Using a chève culture packet:
- Simply open the packet and stir in the contents.
- Allow the cultured milk to sit, undisturbed, for 12 hours at approximately 72°. Proceed to step 4.
If using mesophilic culture and rennet:
- Allow the milk to cool to 76°. Sprinkle in ¼ teaspoon of direct set mesophilic culture. (We use culture MM100.) Allow to sit for a minute or two and then gently stir in to fully incorporate.
- Prepare the rennet:
2 drops of liquid animal rennet, dissolved in 5T of cool, unchlorinated water
OR
1 drop of double-strength liquid vegetable rennet, dissolved in 5T of cool, unchlorinated water
- Add 1 tablespoon of diluted rennet and very gently stir in a up and down motion. Do not over mix.
- Allow the cultured milk to sit, undisturbed, for 18-24 hours at approximately 72°. Proceed to step 4.
- Drain the curd
Your cultured milk should be thickened by now, and may appear like yogurt. You may notice a light green, almost clear liquid floating on top – this is the whey.
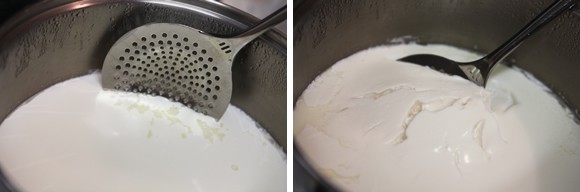
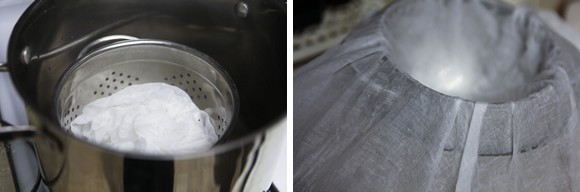
To prepare for draining the curd, sterilize the butter muslin, the colander, and a spoon by steam sterilizing. We use a small stainless steel colander that fits nicely inside our large stainless steel pot. Inside this we place the butter muslin and our slotted spoon. Steam sterlize for 10 - 15 mintues, and allow to cool.
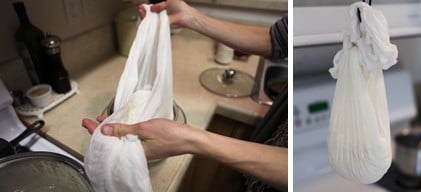
Place the now sterilized colander inside another large bowl, and line the colander with the muslin. Gently spoon the soft curds into the cloth lined colander. Gather up the corners of the cloth, tie together, and hang in a convenient location. It will need to be somewhere where you can place a bowl underneath to catch the whey.
Allow the cheese to hang for 6 – 12 hours, depending on how dry you prefer your cheese to be. We hang for 12 hours.
-
Salt and enjoy!

Remove the cheese from the muslin, put into a large bowl, and salt to taste while stirring. We find a fork works well for incorporating the salt into the cheese. The chèvre can be refrigerated and enjoyed plain, or you can add herbs, nuts, or dried fruit to the cheese. Our favorite combos are: lavender and thyme, herbs de Provence with pink peppercorns, toasted almonds, dried cranberries.
Resources:
New England Cheesemaking Supply Co http://www.cheesemaking.com/
Dairy Connection http://www.dairyconnection.com/
Cultures for Health http://www.culturesforhealth.com/
This is a companion discussion topic for the original entry at https://peakprosperity.com/making-chevre-goat-cheese-2/