Selecting a Greenhouse

One of the most important aspects of becoming self-sufficient is the ability to produce your own food. Many people begin small garden spaces in the backyard as a way to start out and then slowly expand their growing space and variety of crops. Growing your own food can become addictive. After one begins to grow their own food, many will then start looking at new and different methods of how to extend their season and at ways to include plants that require a longer growing season (building a cold frame is a good start).

The vast majority of our country sits at latitudes not suitable for growing vegetables throughout the year and thus leaving us dependent on imported food items both domestically and internationally. We have all heard about food miles and the typical range for food travel is about 1000 miles. The best solution to extend your number of growing days is to look at season extenders and putting in place a greenhouse. With a greenhouse in place you can start growing your own vegetables all year!  In addition to a longer growing season, a greenhouse can assist in increasing the variety of crops you are able to grow. For example, those that live too far north or at too high an elevation to successfully grow summer crops (tomatoes, melons, peppers, etc) can lengthen their season long enough to sustain a harvest.

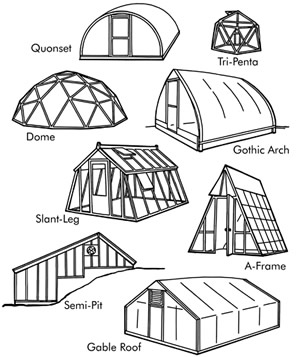
The question now is which type of greenhouse is the best? There is a lot of variation and styles to choose from depending on location, size, cost, durability, and of course, what you want to grow. In this article, we will explore the most popular styles available and hopefully help in selecting the right one for your needs.
 

Free-Standing

Free standing greenhouses are by far the most widely available and customizable structures you can get on the market today. They come in all shapes, sizes, styles and price ranges. When planning on setting up a freestanding greenhouse one needs to keep in the mind the following considerations:

  • The type of growing you will be using the greenhouse for.  What type of plants do you want to keep in your greenhouse?  Do you want to grow year round or use it for seed starting and extending your season?  Will it have a solid foundation or will you want to plant directly into the ground?
  • Site location and orientation of the greenhouse to maximize sun exposure.  Consider site issues such as drainage, snow drifts, sun exposure during the low light of winter, nearby structures that could shade the sun, heavily treed areas, and severely sloped areas.  Space limitations available to set up the greenhouse may also determine ultimate size and location.  If possible, freestanding greenhouses should be oriented with their broad side facing directly north-south.  This will maximize solar exposure during the short winter days when sun is lower on the horizon.  They should also be setup to be level.
  • Distance to utilities and water hookups. You may want power and water supplies directly connected and installed in the greenhouse.
  • Overall weather conditions.  What type of weather conditions will your greenhouse be subjected too?  High winds? Blazing sun? Heavy Snow?  Weather considerations are important for determining the construction materials and overall durability your greenhouse.

Basic Types of Freestanding Greenhouses

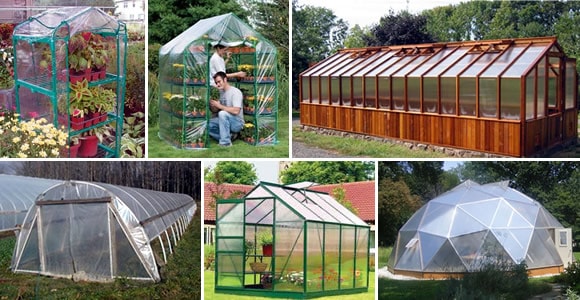
  • Portable / Collapsible / Patio
    • This is an inexpensive and smaller option for seed starting and smaller container plants that need frost protection.  Shelving gives you additional vertical space for growing compared to a cold frame.
    • Being lightweight and usually easy to take apart, portable greenhouses can be put in storage when it is too hot or too cold to use effectively. On the other side of this, be mindful of wind and snow that can blow over or collapse the structure of these smaller greenhouses, as they usually have no permanent foundation.
    • Portable greenhouses are relatively inexpensive, though the materials won't be as durable as bigger kits and systems.  Depending on the particular greenhouse, plan on only getting 2-4 seasons out of them without repair.
  • High Tunnels
    • High tunnels are large hooped frames covered in plastic.  They are probably the best value for the amount of growing space one gets for their dollar.  High tunnels give the flexibility of being able to grow in the ground year round as well as vertical growing space.
    • Snow loads and high winds in your area must be considered as high tunnels are covered in large sheets of poly plastic and can tear or blow off if not secured properly.
    • Drainage is an important consideration with high tunnels.  Since these structures usually have plants directly in the ground, it is important to consider the soil when you set up a high tunnel.
    • Ventilation and roll-up sides are an important consideration with high tunnels because roof vents are not typically included. 
  • Metal Frame & Poly-Panel Kits
    • Metal and poly-panel kit greenhouses are the most popular and accessible to the backyard gardener.  They are widely available through many big box stores and an even larger selection can be found online as well.  When ordering online, be aware of potentially high shipping charges. 
    • These greenhouse kits are easy to assemble and are usually placed on a secure base of pressure treated or plastic lumber.  They are usually setup with a gravel and sand foundation, and should be setup on a level foundation.
    • Most kits include doors and automatic vent openings.
    • Some kits can be later expanded on. 
    • Highly durable and weather secure.  Will usually have a 8-10 year warranty.
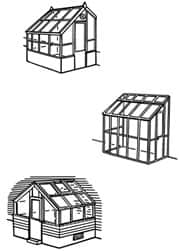
  • Wood Frame & Poly-Panel or Glass Kits
    • Traditional wood greenhouse kits are usually a more expensive option but gives a warmer natural feel to your growing space.
    • Wood frames insulate better than metal frames, given that wood is a natural insulator.
    • Maintenance considerations with wood include mold, mildew and pest issues.  These considerations are minimized by choosing a greenhouse made from cedar or redwood.
    • As with metal kits, wood framed greenhouses often include doors, automatic vent openings, and can be later expanded upon.  They are usually constructed on wood and gravel foundations, and should also be setup level.  They are durable and weather and wind tight, if secured properly.
  • Geodesic Grow Dome
    • A unique greenhouse design that gives excellent in-ground and vertical growing space.
    • The design of geodesic grow domes offers an extremely energy efficient growing space.  These round structures capture sunlight extremely efficiently, and do not have to be oriented in a north-south direction as with other greenhouses.  
    • An excellent option to incorporate aquaponics into your growing space.  Water tanks are highly recommended with geo-domes as a heat sink and humidity source.  
    • Commercially available geodesic grow domes can be relatively expensive compared to other options, though there are some DIY designs available.   
       

Attached / Lean-to

This type of greenhouse attaches to an existing structure, such as a house, typically to the south or southwest wall.  The construction of attached greenhouses facilitates the sharing of solar heat with the structure that it is attached to. They are ideal in climates with a lot of sunny, yet cold, winter days. As the sun heats up the greenhouse during the day, the heat is then transferred to the house. One can reduce their home's heating cost by up to 70% with a properly designed attached-greenhouse. Attached greenhouses can provide an easier setup of utilities since they are connected to an existing structure.

One important thing to keep in mind with this style of greenhouse is the importance of providing adequate ventilation and shading during the summer months. Shade cloth and vent openings will help keep temperatures from getting too high with this shared growing space. 

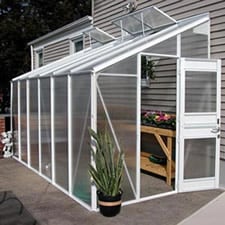
When it comes to winter growing, an attached-greenhouse is hard to beat.  The sharing of the south wall with ones home, enables an easy transfer of heat to the greenhouse in cold nights.  Who wouldn't want to walk out their door, barefoot in January, and harvest a fresh spinach salad for dinner?
 

Things to Keep in Mind

  • When deciding on which type and size of greenhouse you want it is best to always go bigger than you think you need.  Some greenhouses offer expansion capabilities.
  • Air circulation and ventilation are key to a properly functioning greenhouse. The plants take up available carbon dioxide relatively quickly and without fresh air moving through the greenhouse the plants will not grow to their full potential. Fans & automatic vent openers may be part of your overall plan and infrastructure.
  • Cooling your greenhouse in the summer might be necessary in some climates. For high tunnels, rolling up side walls is normally sufficient. However, in other greenhouse designs (freestanding kits, attached/lean-tos, domes) shade cloth might be necessary.  Shade cloth is a simple woven fabric available from any greenhouse supplier. Fans also offer an excellent way to provide ventilation and cooling.
  • Depending on your location, heating your greenhouse is normally not necessary unless you want to push the limits on what your growing.  When heating does become necessary, options such as small space heaters, kerosene lanterns, and commercially available greenhouse heaters can be invaluable. Heaters can also be connected to water-proof greenhouse thermostats.
  • Water has a very high thermal mass value and can store thermal heat that is gained during the day. Adding 55-gallon drums filled with water helps to buffer against the night time temperature lows. Consider using 2 water barrels with wood planking on top.  This not only provides an excellent thermal mass but will also save on buying that additional greenhouse bench.  Also - the water thermal mass can be used as backup emergency water. 

Resources:

Greenhouse Kits:

Growers Supply (FarmTekk): http://www.growerssupply.com/farm/supplies/home

Growing Spaces: http://www.geodesic-greenhouse-kits.com/

Books:

Greenhouse Gardener's Companion, Revised: Growing Food & Flowers in Your Greenhouse or Sunspace

All About Greenhouses (Ortho's All about)

Four-Season Harvest: Organic Vegetables from Your Home Garden All Year Long

The Winter Harvest Handbook: Year Round Vegetable Production Using Deep Organic Techniques and Unheated Greenhouses

This is a companion discussion topic for the original entry at https://peakprosperity.com/selecting-a-greenhouse-2/

There is a huge opportunity to define the future with energy-saving features that keep your produce from freezing in northern climes.  More than anything else, it is labor costs that prevent greenhouses from being a viable business in the US.  A shift up in relative food prices would help with the labor cost problem, but the future is robotic.

We’re entering the beginning of the greenhouse planting season. Should you grow in the ground or grow in pots? There are advantages and disadvantages to both. Here is a system that may give you a way to grow some vegetables in your greenhouse or patio setting. I’ve used it for 3 years in my greenhouse. It works well for small plants like lettuce, beans, peas, strawberries, herbs, etc. It doesn’t work too well for tomatoes, cukes, corn, carrots, beets, etc. The nice thing is that the buckets are portable and can be moved to where conditions are best (e.g. get good sun or avoid early frosts.) You can hang them on hooks or place them on the ground or shelves. It works using organic methods or chemical based fertilizers and pesticides. The plastic bucket limits weeding and evaporation from the soil. The biggest problem is that the buckets have limited water storage and use about a gallon of water every other day or so. I haven’t attempted to install self waterers yet, but I’m sure it can be done.
Here are some examples of buckets. The first one is a bucket of bush green beans in a Homer bucket. (Note: the Homer bucket became brittle during the third year and won’t be used any more. The white buckets are still supple.) This should give you an idea of how the system works and the flap layout. The second bucket contains everbearing strawberries. Both of these photos were taken in late October.

Bucket of beans   Everbearing strawberries

In essence, I copy the following pattern (my avatar) in 3 rows around the bucket. The above examples show 8 cutouts per row, but 4 cutouts per row seems to work best. I’ve tried cutout widths from 1 1/2 inches to 5 inches. 2 to 2.5 inch cutout widths give a large enough growing space while minimizing soil dribble. After you climb the learning curve, you can make one of these in less than a half hour.

Cutout

Steps:

  1. Get a 5 gallon bucket and mark out cutout locations with a marking pen. Do the top row as close to the bucket ribbing as possible. Start out with 2 cutouts centered between the bucket handle ears and then spin the bucket 180° and put 2 more there. Next, mark the second row about 3 inches lower and centered between the top row cutouts. Do the same to the third row so you have a diamond pattern. Leave at least a couple of inches of space below the bottom row and the bucket bottom so the bottom row of plants have some soil to root into.

  2. Use a quarter inch diameter drill bit and drill out both eyes on each cutout. This provides a stress relief isolator for the flap and gives you a place to insert a jig saw blade for step three. At this time, I’d also drill at least 3 holes in the bucket bottom for drainage.

  3. Cut along the line until you get to the other eye using a jig saw. This is much more difficult than it sounds because the bucket is round and has ribs. Take it slow until you get the hang of it. Fortunately, the plants don’t really care how perfect the opening is. If you don’t have a jig saw, you could probably use a box cutter or razor knife and just cut a series of straight lines to approximate the curve. I’ve found razor blades cut me much easier than this plastic. Be careful!

  4. Fold back the flaps (toward the inside of the bucket) and wipe the fuzzy cuttings off all surfaces. I rotate the flaps 180° upward and press hard to develop a hinge across the eyes. The flaps will be ultimately canted at about 30° to 45° from vertical to expose small individual gardens. If a hinge isn’t developed, the flap tends to work itself back to its original configuration.

  5. Get your favorite potting soil, wet it enough that it stays clumped after you squeeze it (wetter is better) and place some of this prewetted soil in the bottom of the bucket until the soil level is even with the bottom of the openings. If you’ve got seedlings, insert them from the outside of the bucket, push the roots through the cutout until the soil plug is about half an inch behind the bucket cutout lip. If the soil plug is root bound, gently tease the roots apart. Do the other garden spaces in a similar fashion.

  6. Once you’ve got all the plants inserted, place some more prewetted soil in the bucket until you’re up to the next row of cutouts. You’ll need to compact the soil along the bucket face between the cutouts so the soil won’t dribble out from these areas as the soil dries. Use your fingers, knuckles, whatever tools work for you. One hand should be inside the bucket and one hand should be at the cutout shaping and compacting the soil around the cutout. Do this for each side of each cutout. Repeat steps 5 and 6 for the middle and top row. Fill the bucket to the brim with soil but scoop out a handful or so from the center to aid with watering.

That’s it. You’ve got a portable garden. If you’d rather start from seeds, follow the same steps, but place a small wedge of soil against the flap to hold it in place and then plant the seeds in this opening. Expect that not all the seeds will sprout, so plant extra and cull as needed. For beans and peas, I usually plant 3 to 5 in each opening and cull to 2 or 3. You can plant different types of plants in each bucket, but keep moisture requirements in mind - cactus and bog lillies have quite different water needs.

Grover


some things i have learned in experimenting with solar food at lattitude 43, and elevation 888 ft

first i started small and did a test with an old window and some bricks against my south house wall…amazing to say the least…downunder i guess you go to the north side.

i learned alot and i can’t say enough, that solar energy has to be experience to be understood.read and do experiments before you go big, or dive right in if that is your style

it’s important to understand the concepts involve…i suggest reading elliot coleman…he has been experimenting for quite some time and gives great advice in his books.

this far north, there are only so many plants that can withstand winter growing , so keep that in mind.

right now on jan 1st, in a warm year, i have peas, carrots, lettuce and spinach, leeks, onions and swiss chard growing. my goal was to have fresh salad in the winter. everything else, i have canned, or dried , or is in root cellar.

pretty amzing stuff to see 110 degrees inside on a sunny day in feb when it’s -10 outside.

the moveable concept is a great idea if you are going big, …one needs to replace all dirt every couple ofyears or move the greenhouse to keep things kosher with the soil.

i currently have a 10 x 20 leanto on the south side of my house which heats my house for 24 hrs if it’s at all sunny.and a free standing 12 x 20 greenhouse

i like triple wall polycarbonate skins, as i have possiblehail and high winds where i liveand heavy snow loads.

there is way too much to say here. so read and learn and get a greenhouse

and yes , once you have one, you will want more. count on it.

btw, i have a chair in mine, and in feb i go sit in it with a good book and enjoy thinking i am not in michigan.


oh yes, greenhouses are not turnkey…they require attention just like any garden, or things of value.
it really depends on where you live with what you can do.

my greenhouses are unheated by out side sources…strickly solar or free

you can, however, heat a greenhouse and grow way more selection of plants…but cost evectiveness goes out the window as the temp needed increases.

i can simulate in michigan zone 5 , growing conditions in atlanta zone 8 with an unheated greenhouse.

[quote=butterflywoman]oh yes, greenhouses are not turnkey…they require attention just like any garden, or things of value.
it really depends on where you live with what you can do.
my greenhouses are unheated by out side sources…strickly solar or free
you can, however, heat a greenhouse and grow way more selection of plants…but cost evectiveness goes out the window as the temp needed increases.
i can simulate in michigan zone 5 , growing conditions in atlanta zone 8 with an unheated greenhouse.
[/quote]
What are your tricks? I’m in Michigan zone 5 too.  Entering our 2nd season with a gable greenhouse.  Last year had to supplement with space heat. Not growing anything this winter, new baby keeping us busy enough. So may be a good opportunity to experiment with non-power heat. Do you use foil or bubble wrap?

hi sj

well understand tricks are developing–always–never ending, but designed to solve specific problems. my problems may not be yours. and vice versa

i’m sort of for learn the concepts and then implement them as you see fit…that way we get lots of ideas of how to make this work vs a do this do that step by step…after all , that is only one answer–we are going to need many

as a base, i am using eliot coleman’s suggestions as concepts and what i notice, and then modifying to suit me. and then there are the happy accidents that occasionally happen -like elliot, i experiment, and remember what works and what doesn’t.

doing is the key  and low key greenhouse doing compliments high key doing with baby.!

you can use this email to discuss specific problems or questions with your greenhouse.

elishevafinearts@hotmailcom

your question is global so i can’t respond specifically

i do not use bubble wrap but so far use agribond 90 row cover as low row cover inside triple wall polycarbonate shellof 8 ft high . and i have never heated  my greenhouse up to this point as i don’t see it as sustainable.

i approach the problem as work with what exist and fit to that, instead of fit to what i wish were to be. i find this gives me immediate sustaining results vs the next great break thru. both may occur , but i am focusing on what will sustain me

if it doesn’t work, i move on to what does. i am not trying to duplicate the supermarket of 24/365 have anything you want

i am developing a menu of what i can grow here, and a menu i like to eat…that changes for everyone. so i don’t say ok guys here’s the one time answer all.

shoot me some questions and i’ll try to share what i know and what i don’t know

Up here in the Great White North of southeastern BC our organization Groundswell  http://groundswellnetwork.ca/  have been trying to grow food year round for our highschool cafeteria for three years in our 3000 sq ft Annualized Geo-Solar greenhouse (AGS) http://www.youtube.com/watch?v=OkLaytBsE3s Last week hit a low of -20C and we were still harvesting greens. With the AGS design  http://www.greenershelter.org/index.php?pg=1  you collect the hot air from inside the greenhouse and blow it through 4 inch Big O tubes in the soil under the greenhouse and as the hot air passes through the tubes it gives off its heat to the soil around the tubes. That soil is warmed up all spring, summer, and fall and the heat radiates back into the greenhouse through the floor during the winter. We have another type of greenhouse under construction and it’s heating system is similar to the AGS method. It is called Subterranean Heating and Cooling System (SHCS)  http://www.sunnyjohn.com/indexpages/shcs.htm and should have these up and running this spring.
One thing we would do differently for northern greenhouses is have the glazed surface face south at an angle perpendicular to the sun angle in the winter months to maximize the solar gain durring that time and minamize the amount of suns rays that reflect off the polycarbonate. studies show that if the suns rays dont hit the glazed surface close to perpendicular than some of the sun’s rays reflect off and don’t enter the greenhouse.

Happy Gardening

Mine is about 18 X 25 with single wall polycarbonate.  I used the inflatable full length poly tube "curtain" along the side and the same only smaller up top on the extended ridge.  It deflates when too hot and fills up when cold - but no giant loud fan or energy bills or louvered vent to freeze up.  Anyway, the point is it just lets hot air rise up and out.  Uses a couple of small fans to stay inflated - with a 12v backup attached.  Definitely a consideration for those of you considering building. 

I'm going to figure this out and would love some help…I spent the last month or so constructing a greenhouse from salvaged wooden windows. Now, I need to make it functionable. I still have some work to do but the beginnigs are wonderful. I intend to heat it passively. I'd like some imput on techniques and logistics. Please take at look at what I've got and share your experience. contentedheartcreations.blogspot.com/


A splendid palace built by a smuggler, Gunsgreen House, Eyemouth, Scotland, offers superb self catering Eyemouth holiday apartments.energy efficient vinyl windows


Time2Help,
That is a very awesome greenhouse that you put together for $800 in supplies.  Very sturdy looking, like it could withstand storm winds and the weight if a big snowfall.  (I appreciate your suggestion to turn the corregated panels so that the ridges run vertically if one lives in a heavy snowfall area.)

Do you think that it needs any diagonal bracing?  Or is it sturdy enough when rocked in the end to end direction?

I wondered about putting a raised beds in such a green house using IBD water tanks that are cut in half.  These 275 - 300 gallon tanks are available used on craigslist in the Virginia area for about $80-$150 each.  I understand that they can be cut down the middle to form strong, deep trays for raised beds.  Also, a tank or two full of water in a green house would help moderate temperature swings (though I have absolutely no experience of gardening into the cool fall months…)

Sorry for the long time in responding, it’s been a busy couple of weeks here.
No diagonal bracing necessary, this thing feels like a tank in the end-to-end direction. That is with the panels run in parallel to the end-to-end direction however, if you rotate them 90 degrees for better snow runoff, you might want to consider adding in two more end-to-end braces (2"x4"x144").
Moving along with the greenhouse project, I’ve converted the interior to one big wraparound raised bed. The two black 55 gallon barrels are thermal mass for cooler nights. Next up are some additional hanging pots, a wood chip floor (over cardboard), and installation of a nice kitchen door I picked up off of Craiglist for 20 bucks.
Getting ready to plant a variety of lettuce, kale, spinach and other cool weather veggies.
I’ll be adding a passive vent in the spring (uses a hydralic plunger with a wax material that will open a vent in the roof when the interior temperature exceeds 75 degrees). I’ll post an update and let you know how that goes.
The tanks you are looking at seem like a great idea, good to keep discrete areas penned out in the greenhouse. I took a slightly different tack with the raised beds, mostly to take advantage of the ground temperature (heating) and to keep the project cost down.
Thanks,
Time2help


Thanks Ana!

Time2help,

I wish I had built my own greenhouse from scratch rather than going with a kit. Yours looks like a nice, simple system that will get the job done. Good work!

I've got a louvered vent on each end of my greenhouse that is activated by a similar wax based plunger. It is able to activate the louvers, but the greenhouse still got too hot with simple passive cooling. I put an electric fan on it, but that cooled the wax enough to shut the louvers. With the cycling, it was still about 20° too warm during the day. (By the way, each year, the wax plungers become less potent.)

I built 4 screen doors using cedar 2 X 2 framing and 1" chicken wire. I replace the regular doors with these when the threat of frost has passed in the spring and remove them when the fall frosts threaten. My greenhouse has enough passive airflow to keep it at most 10-15° above ambient temperatures under sunny summer skies and no breezes. The screen doors keep out animals, but allow pollinating insects (and spiders) access to the interior. Depending on your situation, summer heat may be an issue to deal with. If you prefer passive systems, you could easily put enough cross ventilation in your system to keep it cool.

Grover

Thanks for the head's up Grover.  I'll look to adding a removable screen vent to the bottom of the door and up high on the opposite end (above the barrels).  Always better to learn the easy way (experience versus school of hard knocks)!
Time2help

I know I mentioned this before, but heres a pic of what system I went with - ones low and the others high with separate thermostats for each for more control.  It works pretty slick - no issues thus far…
http://www.poly-tex.com/polyvent.html#.Uknk_z83Ia4

Our winter is so short we don't have plans for a greenhouse at latitude 34, elevation 220-ft.
Instead, we plan on putting removable cold frames in on a long raised be on the south side of the house. Has anyone here built a cold frame, and do you have any tips on building or using one?

hi wendy

i'm in michigan so i have all kinds of stuff.  i have low hoops, cold frames, greenhouse   cold frame in greenhouse…all sorts of combos.


i use 2x12 lumber to frame and put a sheet of triple walled polycarbonate over it  itcomes in 4 ft and 6 ft wide by any length up to 30 i believe so i have up to 6ft wide frames by any length you want.mostly 8 ft so i can handle it. you would have to hinge it or weight it down for windy conditions.and open on sunny days or it frys the plants forget once and all your work gone…


elliot coleman low hoops would do you just fine because they are simple and cheap to make, easy to work with and can grow taller crops in it.than a cold frame. i've had carrots grow in a hoop all winter long with snow and ice on top for several months and they still grow…you should be a snap with your temps and weather

trick also is to get right cultivars…

south side of your house bed might be enough on it's own…don't know how cold you can get? i get 10-15 below zero for up to 2 weeks at a time.as worse case scenario.