Welcome to Part II of our series on the use of light. In Part I, we discussed the intensity of light, its impact on the human eye, several types of lights, and the characteristics of flashlights. In this session, we will discuss how light acts to inhibit or enhance our senses.
As you may know, even in low light, your eyes will adjust, giving you a rudimentary idea of your surroundings. In a world that is increasingly urban and increasingly well lit, we have a concept that is relatively new to the human experience – an environmental light gradient. This gradient is what creates visual disruptions, as we discussed in Part I, by forcing the eye to transfer rhodopsin in the rods of the eyes (which detect the intensity of light in low light conditions) into subordinate molecules, opsin and retinol, in the cones of the eyes, which allows us to perceive color, detail, and depth.
With that in mind, let’s look at some principles in use of light and their effect on humans.
Environmental Light Transitions
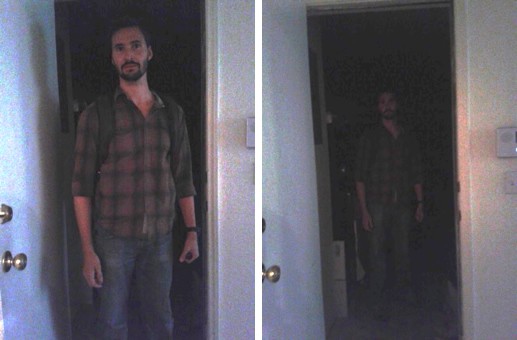
Transitions in light are the very basis of the gradient, but they’re also a distinct hazard that must be considered; whether you’re moving from a lit room to an unlit room or from a daylight environment into a darkened room, you are moving across a gradient that puts you at a disadvantage. Conversely, if an unknown contact or hostile party is forced to cross these light thresholds, it is likely that you will be able to see them before they see you.
This happens because of backlighting. Backlighting creates a silhouette, which is easy to identify if you’re looking out from the dark and into the light environment. This often creates the additional disadvantage for the party moving from the lit environment, as their eyes are subject to the recombination of retinol and opsin once again as they move into the dim/unlit environment.
For this reason, understanding the environmental light gradient and how backlighting creates a silhouette is a critical point for our further understanding of how to use light to our advantage.
So, where do we start if we are faced with this situation?
Recall from my earlier Understanding Emergencies article the concept of “OODA” by Col. Boyd: Observe, Orient, Decide, and Act. Once you enter the threshold, you are committed to your course of action. So, when making a decision on transitioning environments:
- Observe the entryway from a sharp, oblique angle that disallows those on the inside to look out. Careful to avoid standing in front of windows – this is a sure way to silhouette yourself, as you’re backlit.
- Orient yourself to the threshold itself. Is it a door? A hallway? Is there a handle or knob? If so, which way does it turn? Which way does the door open? Are you in a linear corridor? An open area? If you cannot get in through the proposed threshold, where is your next entry or egress point? These are all questions that can rob you of precious seconds in a tense situation, so learn to spot and analyze these features as you orient yourself.
- Decide if passing through the threshold is in your best interest. Are you putting yourself at an unnecessary risk by doing so? Is there an urgent reason to enter? Are there alternative ways to enter? How about to exit? Is it likely that there will be people inside? If so, what is their disposition (hostile, neutral, friendly) and how will your entry impact them?
- Act out your course of action. When you do, be committed, firm, and resolute that your decision is correct. If it is not, get yourself out of the situation before considering all the ways you could have done better or different.
This component on environment cannot be overstated. Making good, efficient, and rapid decisions is going to be a time-saver in a tense situation, and time saved could very well be lives saved. The more you know about the area you intend to enter, the better. It could be the difference between entering, turning on the light switch and finding what you’re after, or moving quickly across a threshold and continuing a very deliberate low-light search for safety.
EXAMPLE: The difference between crossing the threshold and standing back in the dark.
Individual Light Use
The next consideration after the environment is How will I use my flashlight?
Well, there are a ton of diverging schools of thought on this, but start as minimally as possible. Let your eyes adjust and use the natural lighting to your benefit when possible. There are, of course, times when this is not realistic. If you’re in an emergency in which there is still lighting, use it. There’s a notion that the darkness will give you the element of surprise. Maybe it will, and maybe it won’t. But it *does* level the playing field. If you’re able to turn on a light in a room before you enter it, you may well afford yourself an advantage while putting a room you need to assess alight.
Point is, the flashlight is a tool – but don’t forget that there are many other ways of accomplishing the task of lighting an environment. The doctrinal approaches being taught these days are very much geared towards the officer taking down a perp. That’s great and good, but if you don’t have 3 other guys with M4 Carbines stacked on your back, what’s the likelihood that a “bad guy” is going to be overwhelmed by your handheld light? What’s the likelihood he will use the dark to his advantage?
Remember the environment, and don’t fixate on the tool.
There’s a commonly held and cited statistic that three out of four times, when officers are killed during shootings, it happens in low light, and 45% of those occurred with more than one attacker.
An article in PoliceOne stated:
“Aveni points out that 51 percent of the time furtive movement was involved in the MOF [multiple officer] shootings. As many as 75 percent of the MOF shootings he examined occurred at a time of day that "we'd generally associate with reduced light conditions." (Yet in only one report was there any indication that officers used flashlights to better identify possible threats!)
"I've joked for a long time that given low light and the right contextual cues, I could get Mother Teresa to shoot the Pope," Aveni says. "Cops never think they'd shoot an unarmed person inappropriately. But on the street when they have to make split-second decisions, it can happen easier than they think."
(Source)
With that in mind, I want to make sure to mention that it’s perfectly acceptable to verbally confront people you encounter. The confusion that occurs in low-light environments is often deadly. This solution is not only more prudent (especially for citizens), but it affords you a lower threat signature, and the element of surprise if you *do* need to defend yourself.
If you come in sectioning off the corners with a flashlight in one hand and a pistol in the other, you’re going to present a hostile profile. Unless you’ve got a badge and probable cause to back it up, there are only a couple of situations in which I can see this ‘posture’ being a best practice – and those would be in your own home and in a situation where the other party has proven to be hostile. In short, use your mind first.
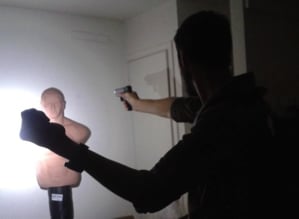
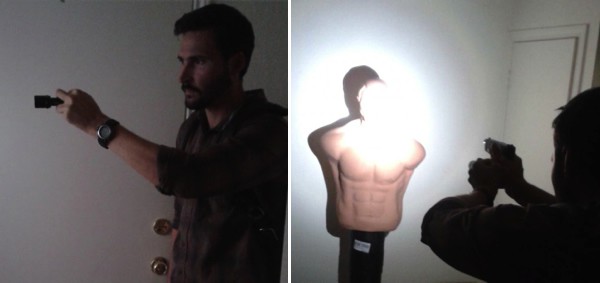
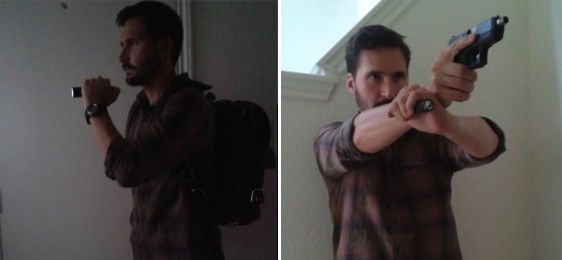
Techniques
There are a variety of techniques for using a flashlight. These include how to physically hold the light as well as where the light is held oriented to the body. Most of these are designed around the use of a weapon and flashlight in conjunction with each other, but there are other reasons to concern and familiarize yourself with these positions: You may be doing a variety of tasks in the dark, from searching under debris to opening doors. You may have to push a heavy object, or even fend off an assault. Should you decide to carry a firearm, these techniques will allow you to blend what you know with the new tool, and you’ll be able to use your dominant side to perform quick manipulations while lighting with your non-dominant side.
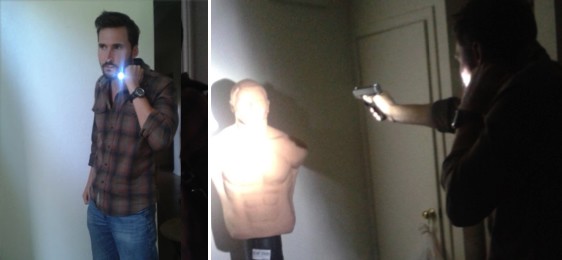
FBI/Modified FBI
This hold became popular due to the notion that bullets follow lights, which is an assessment made for good guys, by good guys. Not to say it isn’t true, but with good light discipline, this hold becomes (in my opinion) obsolete, and while it still has a foothold, it’s not very useful if you’re not using it in conjunction with a firearm.
PRO: Keeps the light away from body, and theoretically confuses aggressive action.
CON: In practical usage, it’s difficult to use this technique when going through doorways or in confined spaces. It tends to snag or hang up if there is a 540 degree debris field (as occurs in emergencies), and perhaps worst of all, it is harmful to your balance and compromises your postural dominance if attacked.
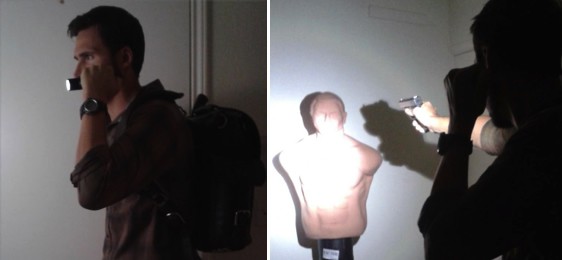
Surefire/Rogers Technique
PRO: The Rogers is a good technique that allows for a solid, effective grip on the light. Activation is done with large motor skills (palm press rather than finger press) which I find to be easier under stress. In addition, I find it to be a bit more stable while using a firearm, and it points very naturally.
CON: Requires a specific type of light to use – if it doesn’t have a Surefire-type tailcap activation, the Rogers technique is going to be a bit clumsy. It also is a bit unnatural if you’re not using it with a weapon, as other grips allow better control over the light.
Harries Technique
PRO: The Harries hold keeps the light in an aggressive forward grip, at centerline, and makes it easy to transition between this position and the neck index. It also allows quick, effective strikes if one sets up their light as an impact tool. HOWEVER – do not attempt to strike if you are using a firearm. This cannot be overstated. Don’t put your hands in front of the muzzle for any reason. Shooting yourself would be a ‘con’.
CON: Use in conjunction with a firearm offers little to no additional stability and creates poor balance by extending the support side arm. Additionally, it requires wrist articulation for many, which is a weak point if you are attacked physically.
Neck Index
PRO: Keeps hands well clear of your front, close to the body, and allows for an aggressive forward posture. Gives the same aggressive stance as the harries, but keeps the support side hand close in and secure close to the body. An unspoken benefit is that the hand and light actually block the highly vulnerable left carotid artery.
CON: This technique tends to silhouette your firearm and create ‘shadows” in your visual field. Light near the body could be a hazard. It’s also has the same disadvantage the FBI technique attempts to circumvent – the light might draw assaults.
“Interview” Hold
This stance is my preference for use of light with or without a handgun. It’s a cross between the FBI, Harries, and Neck postures. Often used by bouncers at nightclubs to ID people, it keeps the support-side hand high and on cue for a defensive posture (default position).
PRO: Keeps the aggressive posture of the Harries grip on the light, and maintains the “upright” posture of the Neck Index, but cants the light out away from the body 8-12”. I like this because it allows me to keep a defensive arm up in situations that don’t require the use of arms, but may require use of force. It is also consistent, and the light is “activated” at eye level, meaning that your chances of using it as a method of distraction might help you save a second or so if things do go bad. The offset light may be enough to draw bullets away.
CON: If held too aggressively, it can obstruct your peripheral vision, and if someone approaches from the support-side rear, the arm is not as secure as it would be in a Harries or in a Neck Index. As with the Neck Index, it casts a shadow.
The responsible use of light in an emergency allows the user to prevent silhouetting themselves or backlighting their friends, and uses the ‘light wall’ principle to give them the advantage when maneuvering. The third and final segment of “Use of Light” will cover movement in the low-light environment, using light as a distraction, the light wall principle, and define some of the light options for more ordinary situations, such as headlamps, lanterns, and other light sources for the long Type III emergency.
Please feel free to test these methods and share your experiences with the PeakProsperity.com community.
Cheers,
Aaron
This is a companion discussion topic for the original entry at https://peakprosperity.com/use-of-light-part-ii/