Vermiculture: Getting Down and Dirty with Worms

Today we are going to be discussing worm composting and vermiculture. Using worms to eat your waste organic matter from the kitchen can be a very convenient method of making black gold. Not only do these red wigglers produce a richer soil amendment than traditional compost (higher in nitrogen, phosphorous, and potash), they make it faster than their microbial compost pile counterparts. Worm composting has a number of additional advantages over traditional composting, some of which include:

  • Can be done both indoors and outdoors (depending on temperatures)
  • Takes a fraction of the space as traditional compost piles and is portable
  • Easy to continue composting during the winter without braving the snow or rain
  • Kid-friendly (my 4 year old daughter adds the daily scraps)
  • The compost (worm castings) and compost tea is readily accessible
  • Easy to expand capacity
  • Can be shared with your community and friends

I will offer a brief overview of how to set up a worm composting system, and then describe my current strategy for increasing my own capacity for composting and supplying friends and family with their own systems.  

What Do You Need To Get Started?
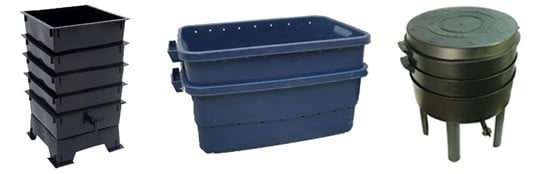
A Container

There are many types of containers that can be used for worm composting. They range from recycled materials (wooden boxes, coolers, plastic tubs) to complete systems that can be purchased at your local garden store or online. Your container should have adequate ventilation (worms need to have access to air) and drainage to maintain moisture levels (holes in the bottom of your container and a tray or second container on risers to sit your primary container on). 

The size of the container should be big enough to support the amount of food scraps you produce on a daily basis. It is recommended that for every pound of food scraps, you have one square foot of surface area. The container should be at least 6 to 12 inches deep to allow for enough depth to cover your scraps when you feed your worms. 

Your container should also have a cover to keep out light (worms don’t like the light) and help maintain moisture. Also, a secure lid can help keep pests and the family pet out of the container.  

Bedding

When establishing a new composting system, you will need to create a bedding material for the worms to live in initially. Recommended materials include such things as moistened shredded newspapers or office paper, shredded cardboard, peat moss, coconut coir, or some soil or mostly finished compost. I have found that a moistened mixture of peat moss, dirt, and shredded leaves works well. The correct moisture level is like a wrung-out sponge.  

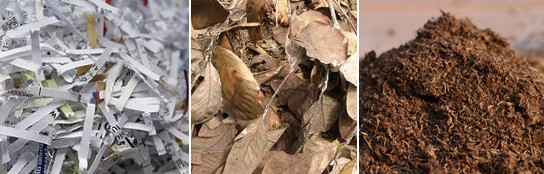
Many materials will work, but the key things to keep in mind are that the bedding should be able to hold slight moisture, that it will allow for the worms to move through, and that there is enough bedding both for the worms to live in and to cover the first round of food being put into the bin. 

What Kind of Worms?

There are two types of wigglers commonly used for composting systems. They are the redworms: Eisenia foetida (red wigglers, brandling, or manure worms) and Lumbricus rubellus.

Worms are usually purchased through an online specialty store or garden supply-store, but I highly recommend trying to get a container of worms from a friend or someone within your community. And if you are feeling really ambitious, you can harvest worms from mature manure and compost piles. You will need about 1000-2000 worms to start. 

What to feed (or not feed) your worms?

You can feed your worms most fruit and vegetable scraps (avoid citrus), crushed egg shells, and coffee and tea grounds (including the filters but no staples). 

Food items to avoid putting in your worm composter include meat scraps, oily foods, dairy items, and other items that would be indigestible to worms (plastic labels, foil, and twist ties -- no trash, please).

To prevent bug and odor problems, bury the food waste by pulling aside some of the bedding, dumping the waste, and then covering it up with the bedding you set aside. Rotate your feeding locations so as not to overload one particular spot. If mold begins to grow, this could be a sign that you are overfeeding the worms. In this case, cut back on their food and make sure to stir and cover food better with bedding going forward.

Where Should You Locate A Worm Bin?

As mentioned earlier, worms can be kept both indoors and outdoors, as long as they are kept within a temperature range of 45-80 degrees F, away from intense direct light, and out of heavy rains. I like to keep mine in the laundry room during the winter and on the shaded back porch during the summer months. If space is available, some people like to keep their worm composters under the kitchen sink or cabinet for direct access and feeding. 

Maintaining the Worm Composter

Feed your worms and maintain good moisture (think "wrung-out sponge"), and your worms will eat their own weight in food every day and transform their starting bedding material into worm castings (a.k.a. black gold!) in 3-4 months.

Once you have established a good base of castings in your composter, you can begin harvesting. The simplest method is to add new bedding and food to one side of the composter, let the worms migrate to this new area, and harvest the castings from the opposite side. 

Another method is to dump out the entire composter onto a plastic sheet, pick out the worms one at a time, and save them for your next composter setup with fresh bedding. Keep an eye out for baby worm cocoons (tiny lemon-shaped pods) to add with the sorted worms. This method is a bit more labor-intensive, but it can be a great family project that will help you maximize your casting harvest.  

Now that you have good baseline knowledge about worm composting, I invite you to set up a worm composter. Worm castings are some of the best compost you will ever work with. The next part of this article will hopefully give you some inspiration on building your own composter cheaply as an additional tool for building resiliency into our lives.

Divide and Conquer

DIY Worm Composter

The Dilemma

My family recently moved from a mini-homestead in Colorado to a rental home in Northern California to begin establishing our long-term homestead. One of the garden items we brought with us was our Can-O-Worms composter with our well-established two-year-old army of worms. We love our composter, but somewhere in the shuffle of moving, two out of three trays did not make it to the new location. We were suddenly faced with a problem of limited capacity for our kitchen waste, and we hate throwing away scraps. So after a few nights researching, shopping, and finding that new trays were too expensive, we decided a DIY (do-it-yourself) composting system would solve our problem nicely. Conveniently, after our recent move, we have more plastic bins than we know what to do with. (You will have to excuse the color; it is what we happened to have. Thankfully, the worms don't seem to mind it.)

The whole process of building a new composter from materials on hand was quick and easy. Total cost was about $10 and took about 15 minutes to put together. We divided our worms between our old Can-O-Worms and our new DIY bins and have nearly tripled our composting capacity.

Materials and Process

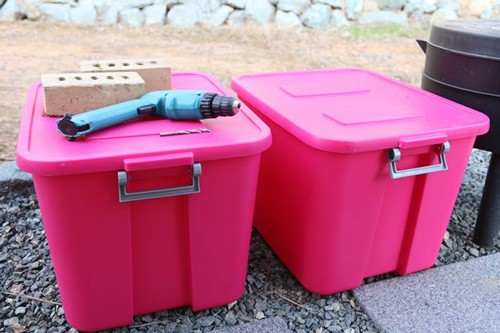
 2 tubs (20 gallon), 2 bricks, drill, and ¼ inch bit. 

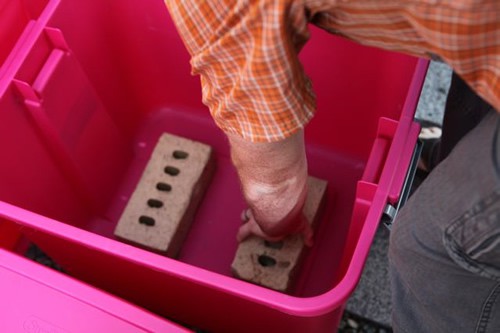
 Place the bricks in the bottom tub (this is where excess liquid will drain, compost tea).

Drill about 25 holes in the top lid.

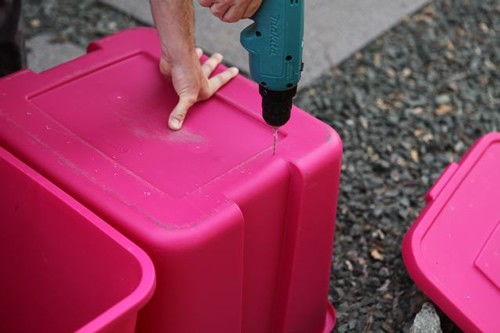
Drill about 20 holes on the bottom of the top tub.

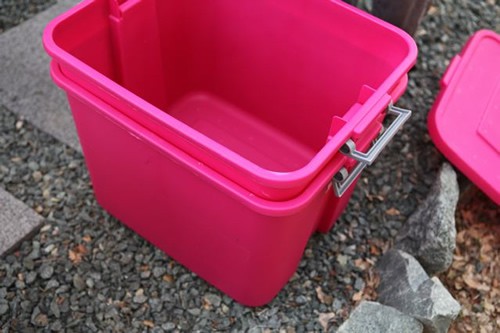
Place the tub with the holes in the bottom inside the tub with the bricks.

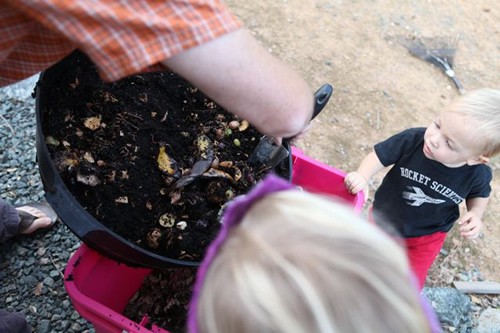
We divided the contents (worms, castings, food) of our Can-O-Worms tray into our new composter to set up the new army.

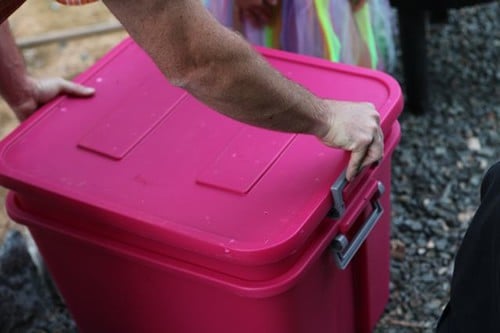
Snap the lid on (I really like the handles that snap – keeps the lid nice and secure) and our new composter was complete.  

This was very simple to do. It has inspired me to divide both our composters again in three months and give new composter setups to friends and family who are not yet composting with worms. Who wouldn't want a worm composter for Christmas?

So I invite you to get some worms, build a composter, have some fun, and start making some of the best soil and compost you will ever work with. 

Links and Resources

Commercial Worm Composters:

Books:

Live Red Worms:

This is a companion discussion topic for the original entry at https://peakprosperity.com/vermiculture-getting-down-and-dirty-with-worms-2/

Thank you jasonw !  Best of luck in N. Cali !

nice article- I’m jealous now, because that was the one thing I felt competent enough to write about.  Good work though, nice to see that others consider it one of the useful skills to develop.

I may not be crazy about goldbugs, but I’m definitely a fanatic about "black gold"-bugs!
Nice piece…Jeff

I’m new to this site, and as I make my way through The Crash Course for a second time, ‘taking it all in’ has been overwhelming and not just a little bit depressing.  Thanks so much for this hands-on, fun project idea!  And thanks, also, for reminding newcomers of all the help and support that is available on this site. 
-Jenny from TN

 Great article!

Make sure you get the right kind of worms.  I got my replacement worms at the bait shop—red wigglers, or tiger worms ( If you look closely you can see the stripes).  I wish I had bought more; it has taken a while to build the colony up again.

I have the can of worms.  It has a drain area they say is good for compost tea.  I have found that it is not good to add that much water.  The liquid from the daily coffee filter has been about right.  The instructions said to add additional water.  I think that is how I killed my first colony.

The container came with some kind of coconut fiber that expanded when I added water to it.  Now the bedding I use is shredded newspaper and ripped up cardboard.  Get them damp and squeeze out too much water.  Don’t use the shiny pages.  If you leave plastic labels on things you will find them in the finished compost, so get rid of those.

The can of worms has three trays and the worms can go up and down between the trays.  As the food is depleted in one area, they will move up to better pickings. Or at least some of them will— worms don’t seem to be too bright.  Some folks say you should stir them up every week to help move things along and break up the bedding.   How often you harvest seems to depend on lots of things—how many you have, what you feed them, what system you have, what the temperature is.  I try to get in there about every two weeks.  I use gloves for the “ick” factor and in case there’s anything else in there with them.

Adding fruit peelings is good for the worms, but also good for fruit flies.  Seriously bury fruit under the bedding or they will be a constant pest.  If the bin is outdoors,  bugs may get in—that’s OK, they don’t care.

Some folks run their worm scraps through a blender—they do eat faster that way.  Large scraps take a long time to break down, and the worms are really more interested in the microbes on them anyway.  You can put your blended scraps in the freezer  for another day if you made too much. 

Starbucks will give you their used coffee grounds and the worms love them;  just ask.

Harvesting takes a little time, but is not too complicated.  The basic  way takes advantage of the fact that worms really hate light and will dive back under the ground to get away from it.  So, you spread some out, give them a second, and then go through the top layer.  Save the eggs—they are a little shiny and worm colored like little lemons—and of course, save the worms, and separate the compost that is really friable and obviously done.  Return the worms, eggs, and any unfinished bedding back to the bin for another day .

The garden really loves this stuff.  Scientific tests have proven that 20 percent worm compost is the optimum for strong, healthy plants that grow vigorously and are disease resistant.  Worm tea is also a good additive and can even be sprayed onto the leaves.

Gotta love the worms.  When you get all depressed over the state of the world, go to the worm bin and stir things up a bit.  Harvesting from the worm bin will make you downright philosophical, Shakespearean even, or remind you of great biblical truths.  At any rate, it will take you far away from the world’s problems and a little closer to a solution.

 There is a reason why they tell you not to spread new food over the whole bin.  Different worms have a different tolerance for new food.  I don’t know why–personality, age, whatever–and some keep a distance from new food when it is first added while another may be more adventurous and go towards it.  So they idea is that the worms need a place to be if they really don’t want to be right next to the new stuff,.  Therefore you put it in one part, cover it, and don’t add a lot more until that has been eaten,
Large worm operations kind of do that too.  For example, a worm trench keeps adding scraps or refuse into a trench in a line, but doesn/t go back and cover the old part with new food.  That way the first part of the trench that was fed will be the first part of the trench to be harvested.  On a farm worms can eat all kinds of things.

Here, here!  I started my worm-bin "farm" about 6 months ago and I love it!  I would say its almost exactly as what is described above by Jasonw.  I also added red wiggler worms (eisenia Fetida) to my aquaponics system.
I would like to build a much larger worm farm.  I have access to cafeteria scraps from a cafeteria that serves 300+ meals a day.  I also have a small farm with lots of mangos on it (120 mango trees).  Many mangos are pecked at by birds, or fall and are damaged.  In any case, they are unmarketable, but would make for great worm food.
Does anyone know of proven scaled-up systems?  I remember seeing a setup which looked like a saran sheet about 3’x5’ strung up on poles, (one on each corner) about 1-2 feet off the ground.  I was told that was a vermi-composting set-up, but since  I was not into worm farming back then, I didn’t pay much attention.  They had a series of these set up, with a concrete floor underneath.  I am not sure how the harvesting of vermicompost worked in these systems, but they looked to be quite scalable. 
Anyway, great post.  Cheers,
 
FB

Hi all,
Worms don’t actually eat your food scraps, they eat bacteria and microfauna that are feeding on the food scraps. The smaller the food pieces, the more surface area per unit volume which gives bacteria more access to the food allowing them to multiply faster. Be careful because bacteria can multiply so fast that they consume all the available oxygen and turn your compost pile anaerobic. The easiest way to tell is with your nose - if it smells bad (ammonia, rotten eggs, etc.) you may have overloaded the pile. If you don’t take corrective action, you could kill your worms. This is more likely to be a problem if you have a small in-house worm bin. Err on the side of too little food until you’re comfortable with the operation. Remember that worms need oxygen to survive.

The worm castings are quite magical! Although the worms eat bacteria, their castings have more good bacteria per unit volume than the stream they consume. They build up the soil tilth and add nutrients that plants can more easily access. As noted by maceves, 20% worm compost is optimum for strong, healthy plants. Any percentage you can add to your plantings is good.

Those little lemon shaped cocoons contain the baby worms for the next generation. If birds eat one of these, the babies can survive the journey through the bird’s gut and start a fresh colony if the bird defecates in a suitable spot. I’ve found colonies of worms in clogged gutters, in piles of old horse "biscuits", anywhere the conditions are conducive. If you have a horse boarding stable nearby and they have piles of rotting manure, you may be able to get your worms for free.

Thanks for writing the article jasonw,

Grover

http://www.google.ca/search?source=ig&hl=en&rlz=&q=large+scale+vermiculture+composting&oq=large+scale+vermiculture+composting&aq=f&aqi=&aql=&gs_sm=e&gs_upl=506l506l0l1070l1l1l0l0l0l0l165l165l0.1l1l0#hl=en&rlz=&q=large+scale+vermiculture+composting&gs_sm=e&gs_upl=506l506l0l1070l1l1l0l0l0l0l165l165l0.1l1l0&um=1&ie=UTF-8&tbo=u&tbm=vid&source=og&sa=N&tab=wv&bav=on.2,or.r_gc.r_pw.,cf.osb&fp=5cc42bdecf0d88a0&biw=1639&bih=800
hell yes.  one of my favourite success stories is of tom szaky who started terracycle, I’m sure his setup (and others) is factory sized now.  I personally think that the bigger the setup, the less vulnerable it is to overheating/cooling, incorrect green/brown mixture, etc- the little guys will move over to where they like it.  Unlike the other kind of factory farming, it is all "free range".
 

For over three years, my red wigglers survived and multiplied in a shallow (less than 8 inches tall) transparent Rubbermaid container with an opaque snap-on lid.
The worms had poor ventilation - no holes in the top or bottom - just any air that came in under the (not-at-all-air-tight) lid.

Every week or two, I would just dump some old molding broccoli or cabbage ends or whatever in there, leave it alone, and come back to find it all churned away into black mud. If I dug around a little, I would see many of the worms wiggling around.

The environment was always extremely wet and stinky, with some algae growing. There was as watery worm-tea at the bottom with no drainage - I would push aside some of the mud to get at the yellow/brown liquid to fertilize potted plants.

I think they may have died or something - I don’t know. My wife threw it out a year or so ago before I had a chance to check them out one last time to see if they were still alive.

Poet

I found Uncle Jim’s Worm Farm online and purchased 4000 worms to put in my garden.  i had filled in an old pool with dirt for my fruit trees and othe veggies I plant around the trees.  I couldn’t have found a better place to buy them from.  They are very helpful and will answer your email questions promptly. 
Cheers,

Ernest

 I love this post!

I built my own vermicompost system after eyeing a cermaic sink that was about to be thrown out. It was a  perfect basin for which I could a vertical system. I built 5 wooden boxes that sit on top of the sink and the sink basin.

What is really advantageous is the way that the compost tea funnels down through the system and into the sink drain. I just pour a gallon of water down the top of the system and voila! within minutes I have a batch of compost tea to shower the plants with.

One thing I will say is that whatever system you have will require a few months of experimentation. I have had bouts with certain types of fruit flies and have funky smells. I am now almost completely up the learning curve.

I have found that harvesting worms is a big pain in the ass, so I just don’t do it (I’m lazy and the process is messy). I throw the compost, worms and all, onto my garden. My logic is that the worms double every eight weeks, so as long as I keep a few thousand worms in reserve I’ll get get my population back up again.

I have so little free time that if vermicomposting were not easy to do then I would not have been able to keep this up for two years. Vermicomposting is fun and easy!

Steve

The Baby Bedding Sets
A baby bedding sets are designed to the babies to give the best environment to the child. A quality baby bedding set is essential in making your nursery warm and inviting. Cotton Tale uses quality materials and unique designs to create your perfect nursery.
 

If you don’t like worms, don’t read this, but if you do…
I had a foamy mess outside the worm bin that looked like foamy banana and strawberry, which had been their dinner a few days ago.  I turned the tap and had more than a gallon of "tea" from the bottom.  When I opened it up, there was a little bedding left, but no food and a huge population boom—probably because of all the warm weather we have had.  There were some in water in the bottom.   I can’t find anything in the literature about this; the worms seem fine.  I am curious though.  I had switched the bedding to cardboard since they seem to like it better–does it hold too much water?  Do a lot of worms make the bin more watery?